
Festive Christmas Cupcakes: Easy Decorating Guide & Delicious Recipe
Embrace the holiday spirit with these charming Christmas cupcakes! Featuring soft, fluffy vanilla cupcakes adorned with a smooth vanilla buttercream frosting and your choice of festive sprinkles, these treats are perfect for any festive gathering. Detailed decorating instructions and a full recipe are included below to help you create edible masterpieces.
Embrace the Joy of Holiday Baking with Adorable Christmas Cupcakes
The holiday season often beckons us into the kitchen, a time-honored tradition of baking sweet delights. While many of us typically dive into making dozens of beloved Christmas cookies, this year, I found myself drawn to a different kind of festive treat: beautifully decorated Christmas cupcakes. It was a delightful detour that brought back a passion I hadn’t realized I missed.
In my early twenties, I harbored a serious enthusiasm for cake decorating, a hobby that allowed me to lose myself for hours in a world of vibrant frostings, intricate piping tips, and a cascade of colorful sprinkles. This holiday season, I rediscovered that creative joy, and the result has been batches of truly merry and utterly delicious cupcakes. It’s a wonderful way to express creativity and share something special with loved ones.
For anyone eager to try their hand at festive baking, I’m thrilled to share some of my favorite Christmas-themed cupcake designs. These particular Christmas tree and Christmas wreath patterns are specifically chosen for their beginner-friendly nature. If you’re new to using piping tips, you’ll find these designs surprisingly straightforward and quick to execute. Even better, if you prefer an even simpler approach, I’ve included instructions for creating similar designs using just a ziplock bag and a butter knife. I’ll provide my go-to recipe for fluffy vanilla cupcakes and a simple vanilla buttercream, but feel free to substitute with your preferred homemade recipes. And remember, there’s absolutely no shame in opting for a convenient box mix to save time – the goal is to enjoy the process and the delicious outcome!
So, gather your ingredients, clear your schedule, and let’s embark on a sweet adventure to bake some truly spectacular Christmas cupcakes!
Essential Christmas Cupcake Decorating Supplies
Before we dive into the delicious vanilla cupcake recipe and buttercream instructions, let’s ensure you have all the necessary tools and festive flair for decorating your Christmas cupcakes. Having the right supplies on hand will make the process smooth, enjoyable, and ensure your festive creations look as good as they taste.
- Food Coloring: The right shade of green is key for our Christmas trees and wreaths. You have a couple of options:
- I often use Color Garden natural food coloring because it produces a beautiful, vibrant green. Just be aware that natural colorings can sometimes impart a very mild “leafy” flavor.
- If you prefer a completely neutral-tasting coloring, an artificial gel coloring like Wilton’s green gel food coloring is an excellent choice. Gel colorings are highly concentrated, so a little goes a long way to achieve bright, rich hues without adding excess liquid to your buttercream.
- Sprinkles: Sprinkles are the jewels of your Christmas cupcakes, adding sparkle and texture. The possibilities are endless!
- I used a delightful medley mix similar to these green metallic sprinkles, which instantly elevate the festive look. Many brands offer a wide variety of fun and unique mixes on Amazon.
- For those seeking options free from artificial colorings, this brand of natural sprinkles provides a great alternative without compromising on visual appeal. Choose whatever colors and shapes resonate with your holiday theme!
- Piping Tips & Bags: These are indispensable for creating intricate designs, but don’t worry, even beginners can master them with a little practice.
- If you’re looking to start a collection, investing in a basic set of piping tips along with a set of disposable piping bags is highly recommended. These sets usually include a variety of tips perfect for many decorating projects.
- For the specific designs featured here, I used Wilton piping tip #3 (small round), tip #18 (small open star), and tip #199 (small closed star). These three tips offer versatility for both tree and wreath patterns.
- Small Offset Spatula (optional): This tool is fantastic for spreading a smooth, even layer of frosting.
- I found a small offset spatula incredibly useful for applying the white base frosting layer on these cupcakes. However, if you don’t have one, a regular butter knife works just as effectively to achieve a similar result.
- Cupcake Liners: While they hold the cupcake, they also add to the overall aesthetic.
- I opted for basic white liners for a clean, classic look that allows the green frosting designs to truly pop. However, feel free to choose liners that match your holiday decor, whether that’s red and green patterns, metallics, or any other festive style you love.
Beyond these specific decorating tools, remember you’ll need your favorite cupcake and frosting recipes. As mentioned, I’ve used a slightly adapted version of Cupcake Project’s renowned vanilla cupcake recipe (without vanilla beans, as they can be tricky to keep on hand!), paired with a wonderfully simple vanilla buttercream. The key is to use recipes you trust for delicious results.
Step-by-Step Cupcake Decorating Guide
Once your vanilla cupcakes are baked to perfection and completely cooled, and your luscious vanilla buttercream is ready, it’s time for the fun part: decorating! Divide your buttercream, reserving about one-third white and coloring the remaining two-thirds a vibrant green. Then, follow these simple steps to bring your Christmas designs to life.
Crafting Elegant Christmas Wreath Cupcakes:
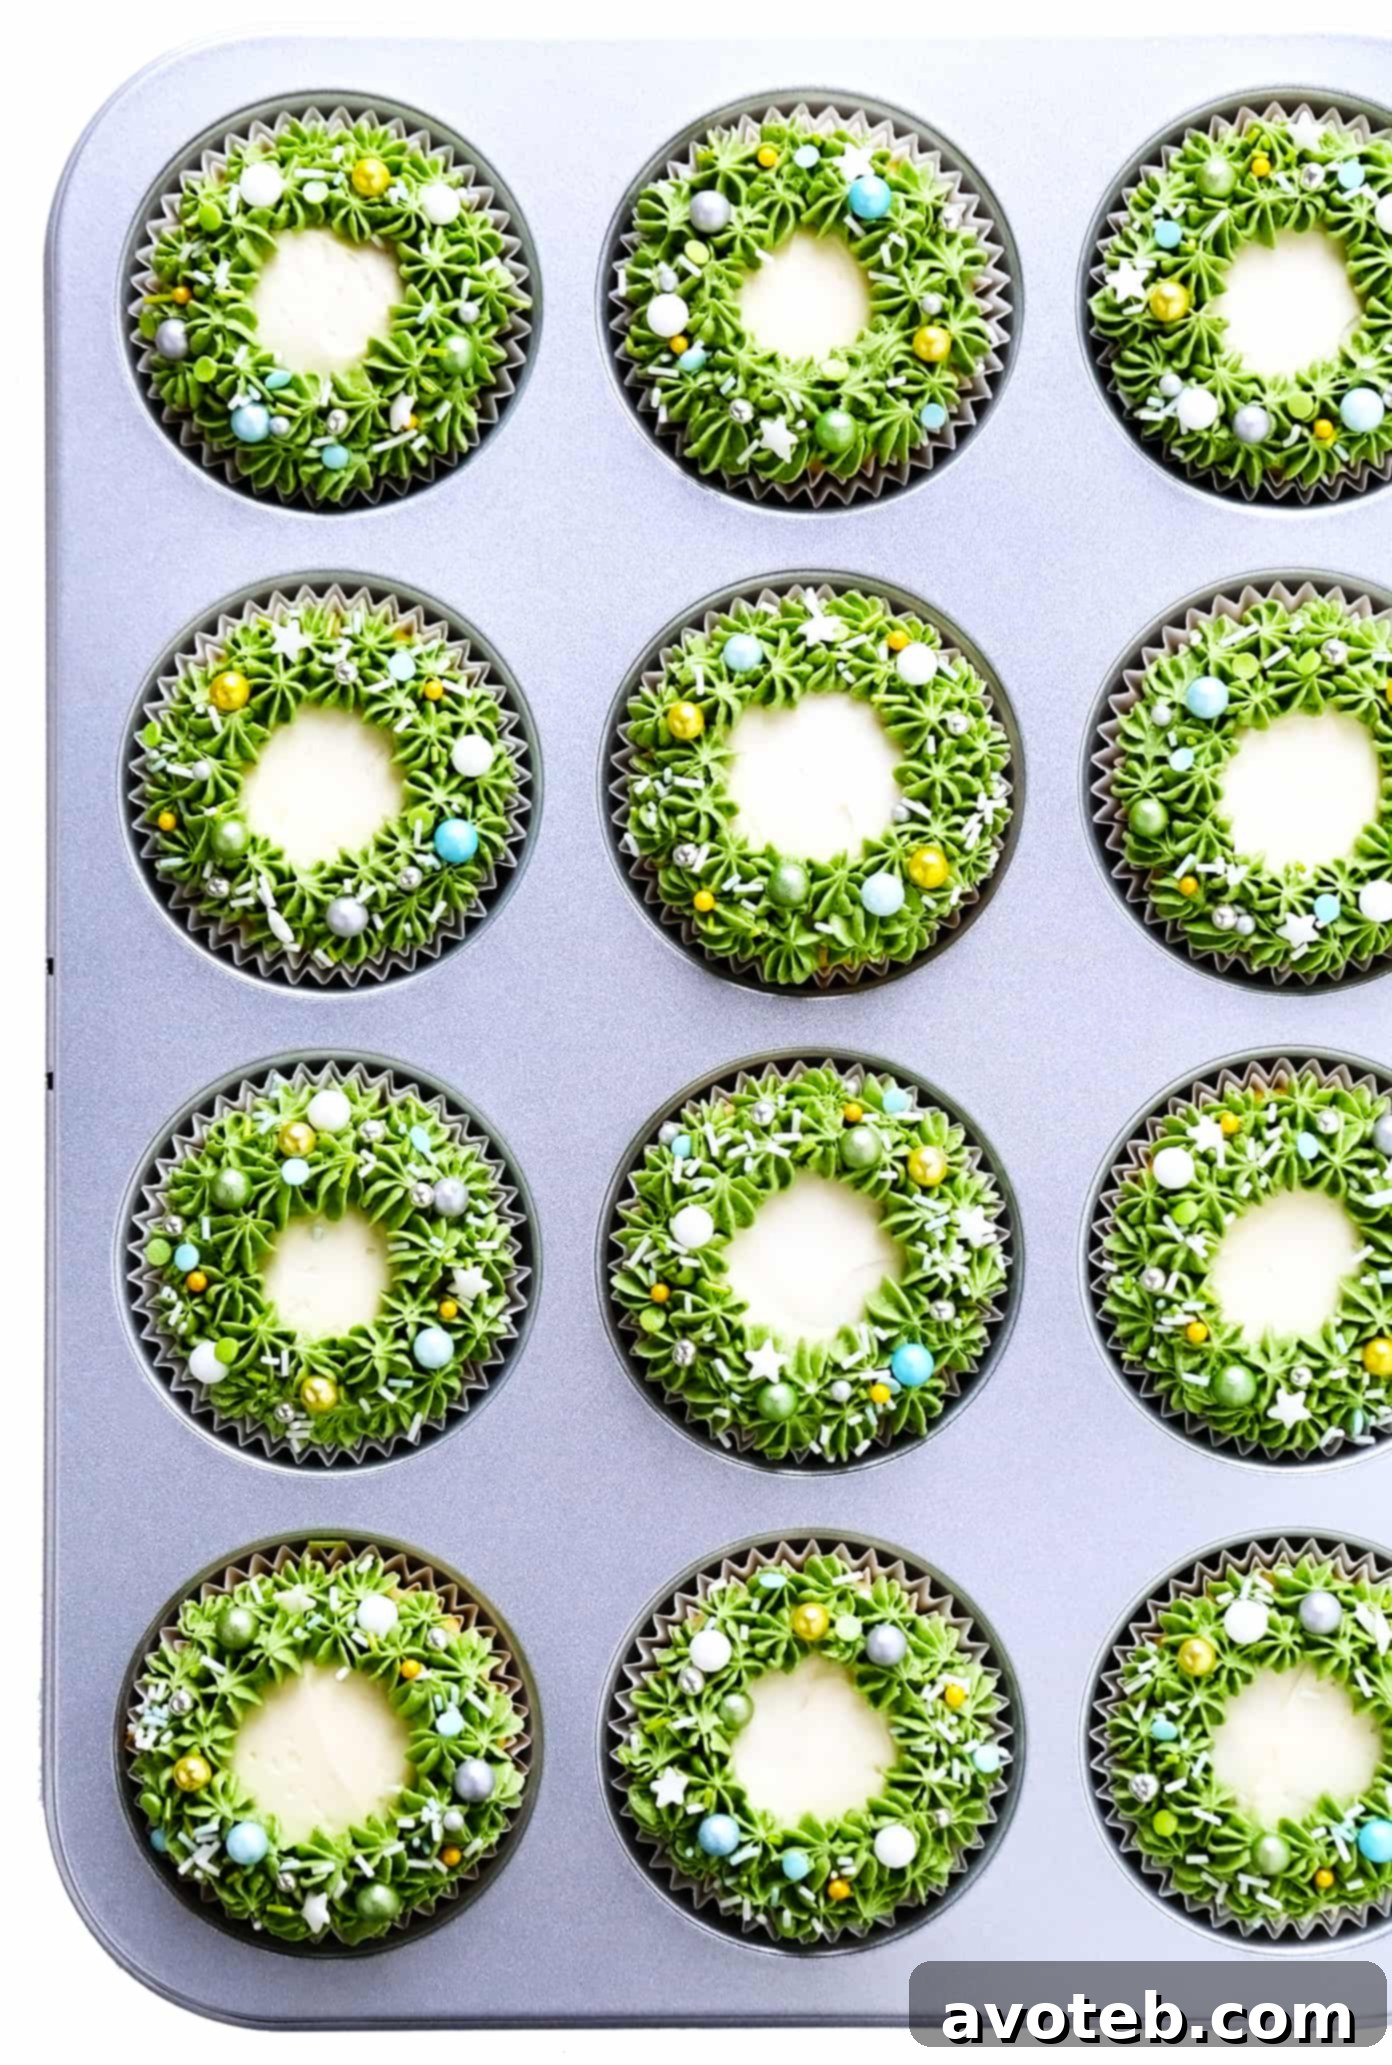
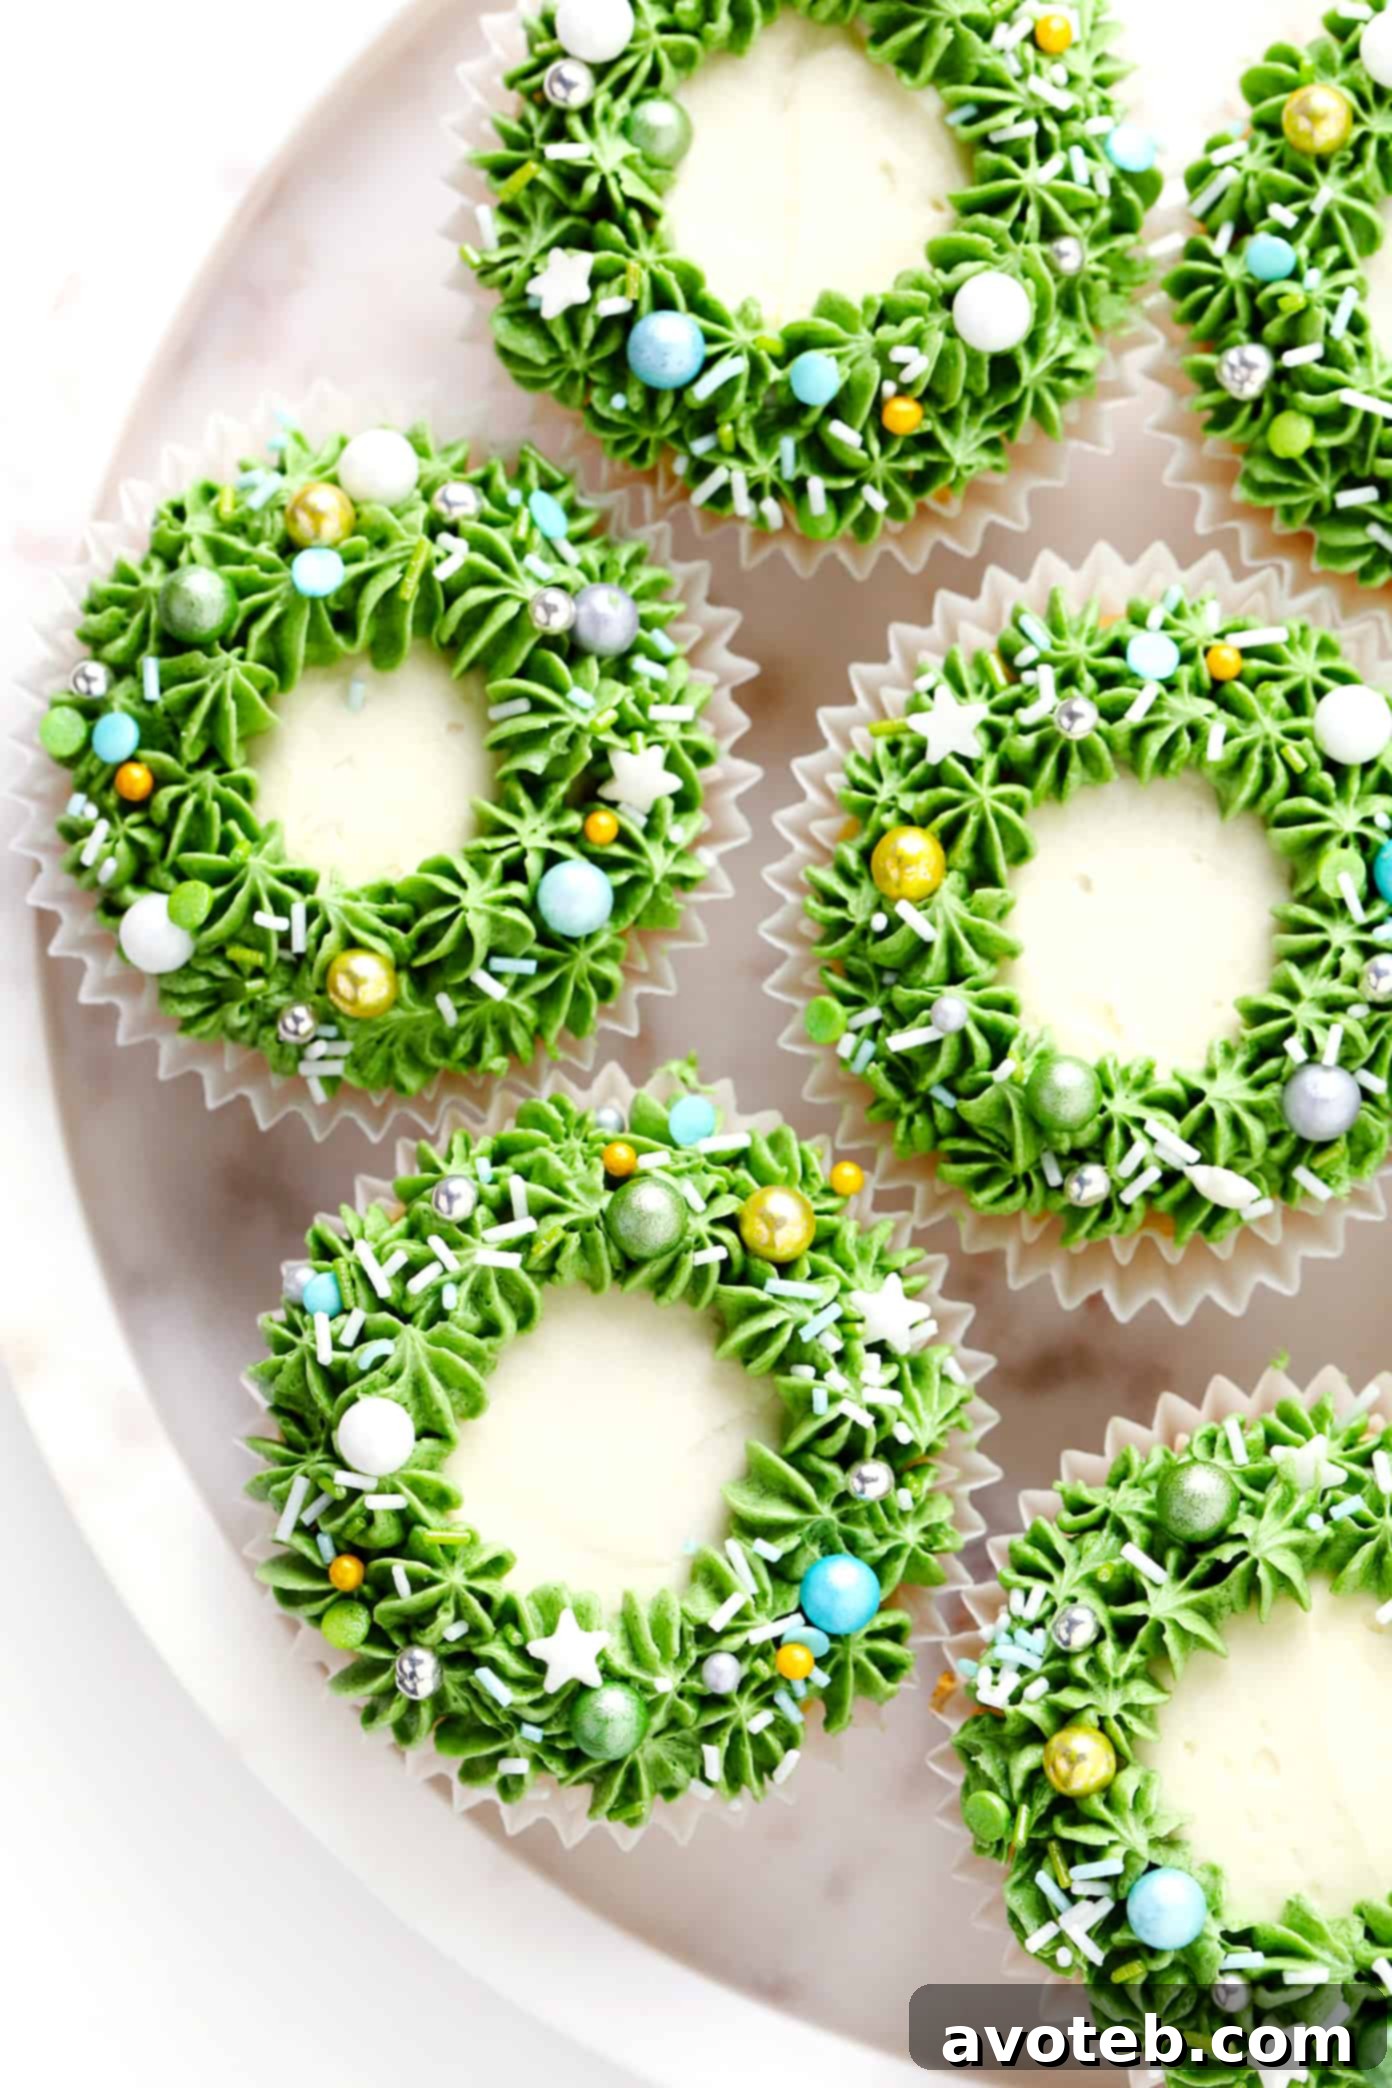
- Begin by spreading a thin, even base layer of white frosting over each cupcake. An offset spatula or a butter knife will help you achieve a smooth surface. This white base serves as a beautiful backdrop for your green wreath.
- Next, fill a piping bag fitted with the Wilton #199 star tip (or similar closed star tip) with the green buttercream.
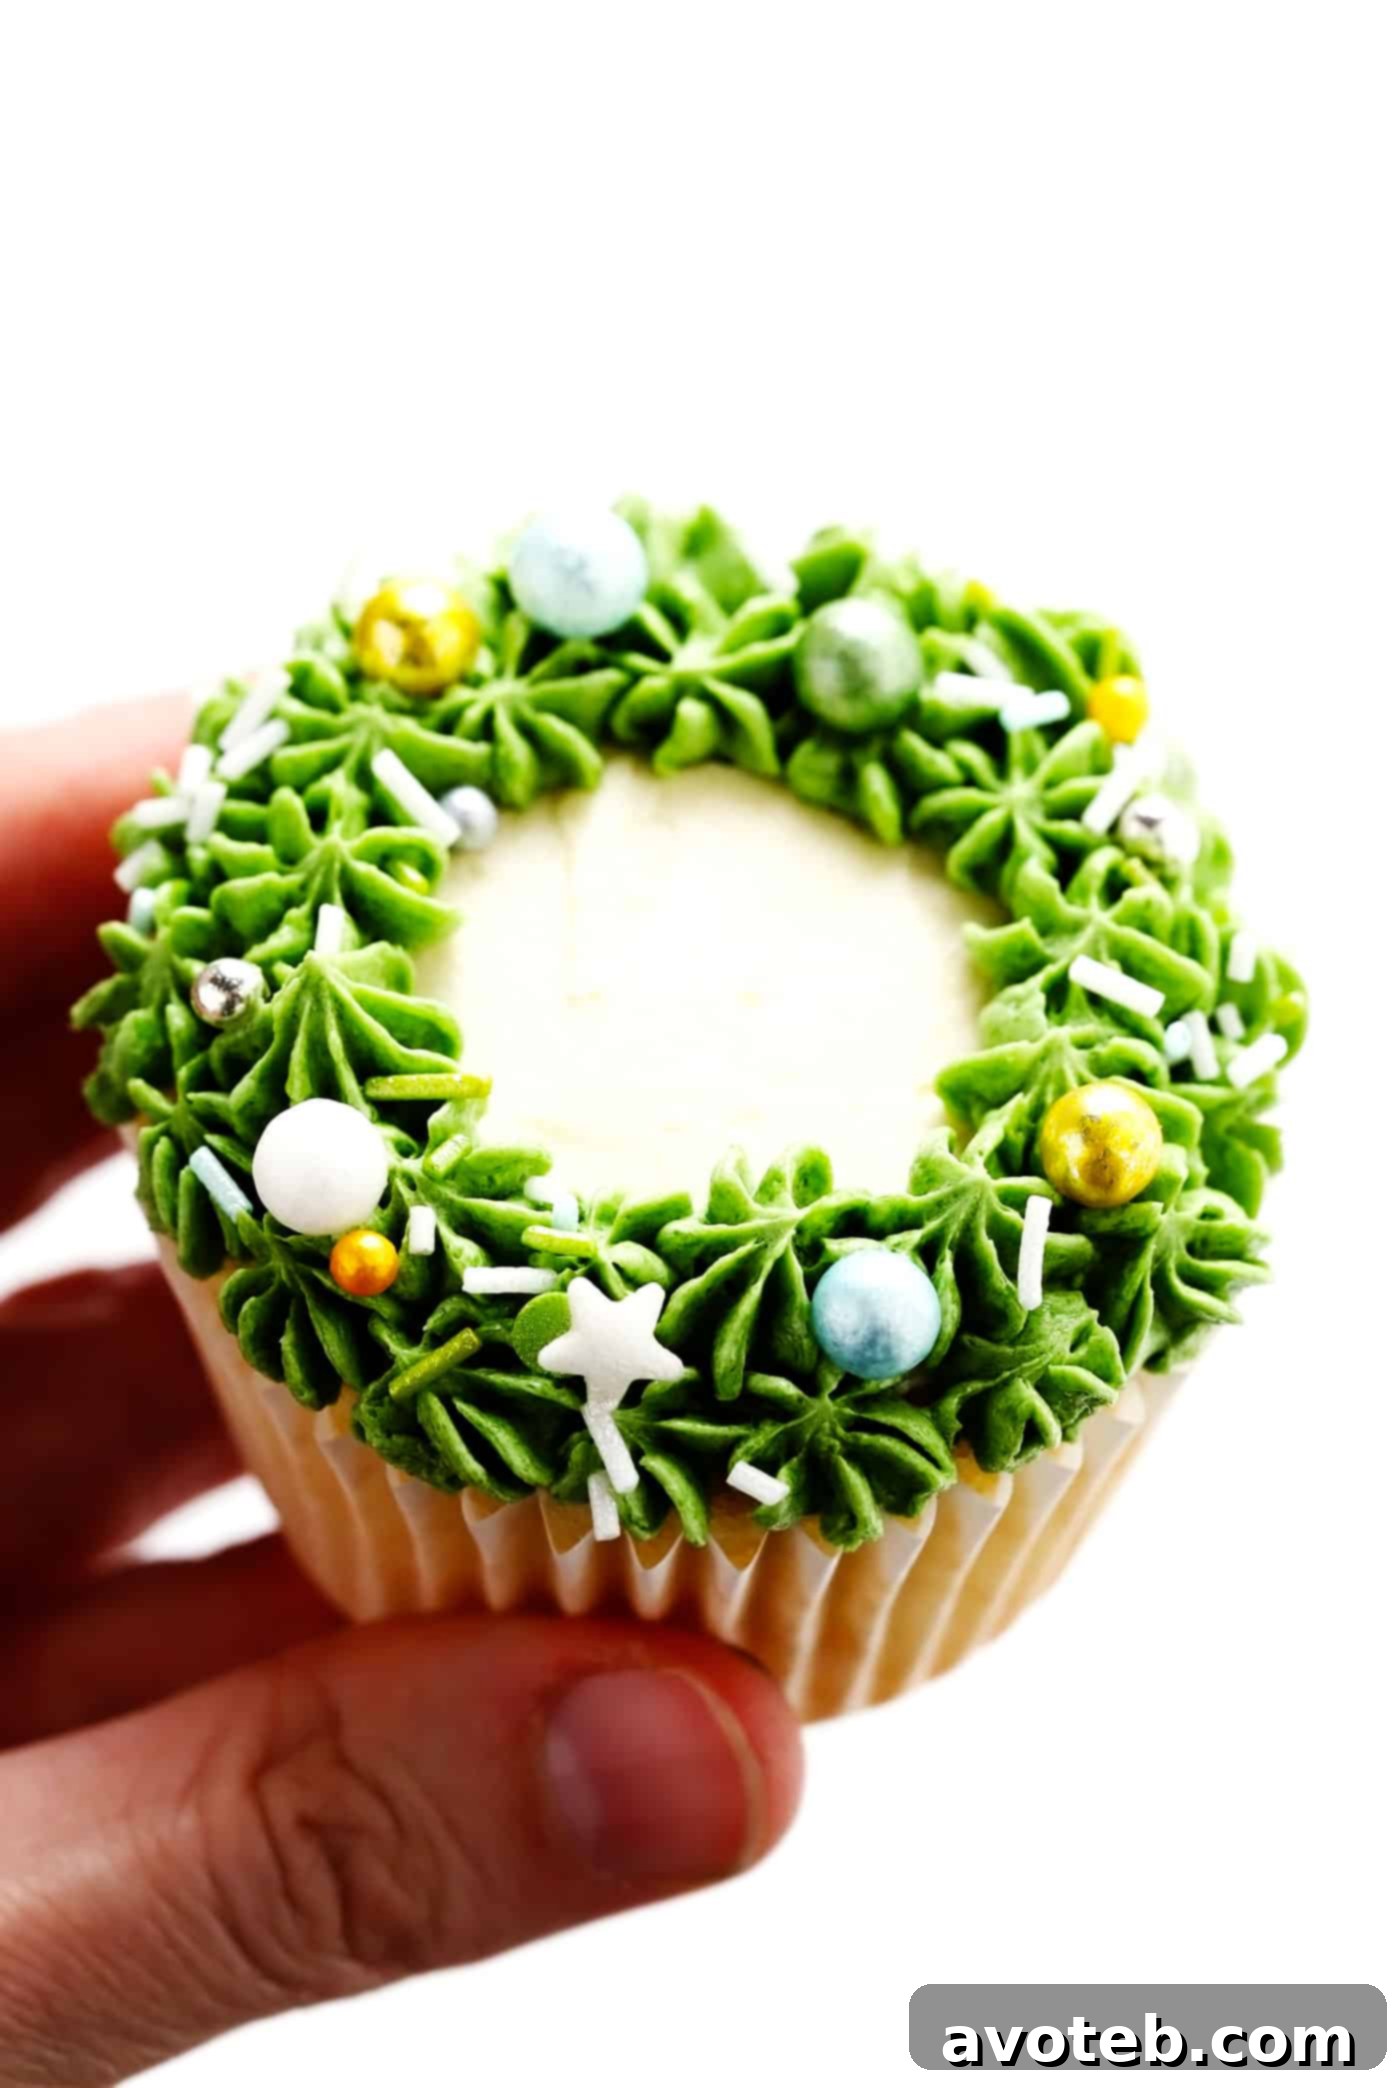
- Carefully pipe an outer ring of small stars around the edge of the cupcake, forming the initial shape of your wreath. Maintain even pressure for consistent star shapes.
- Follow this with an inner ring of stars, nestled just inside the first, to create a fuller, more defined wreath effect.
- For an extra festive touch, immediately add your favorite sprinkles onto the green wreath while the frosting is still soft and tacky. This ensures the sprinkles adhere well.
Designing Charming Christmas Tree Cupcakes:
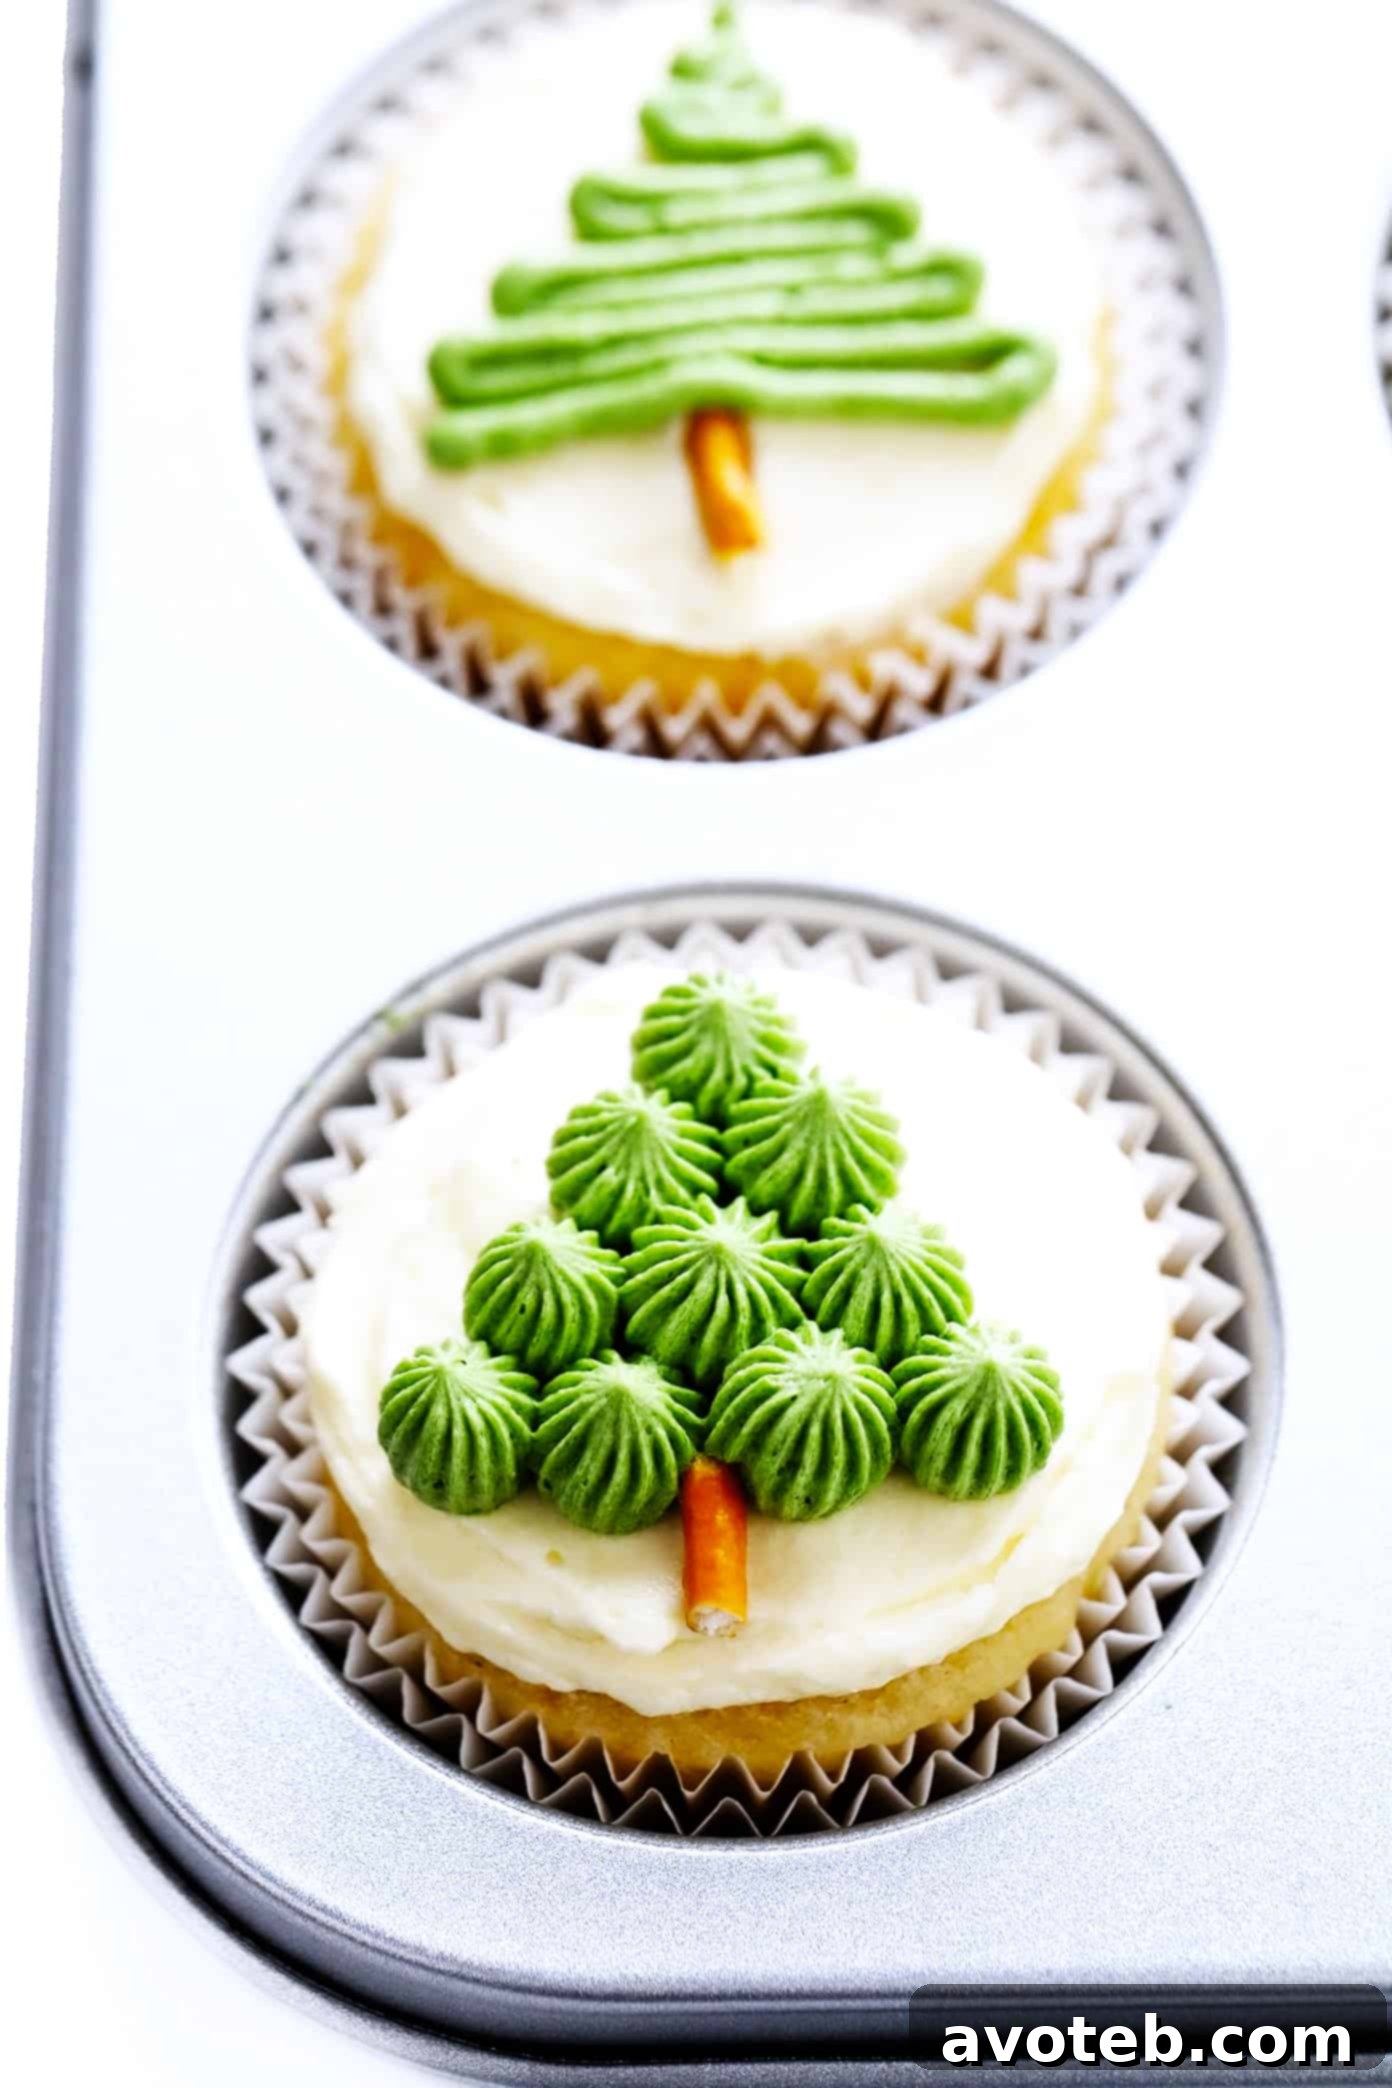
- Just like with the wreaths, start by applying a thin layer of white frosting to each cooled cupcake using an offset spatula or knife. This provides a snowy ground for your trees.
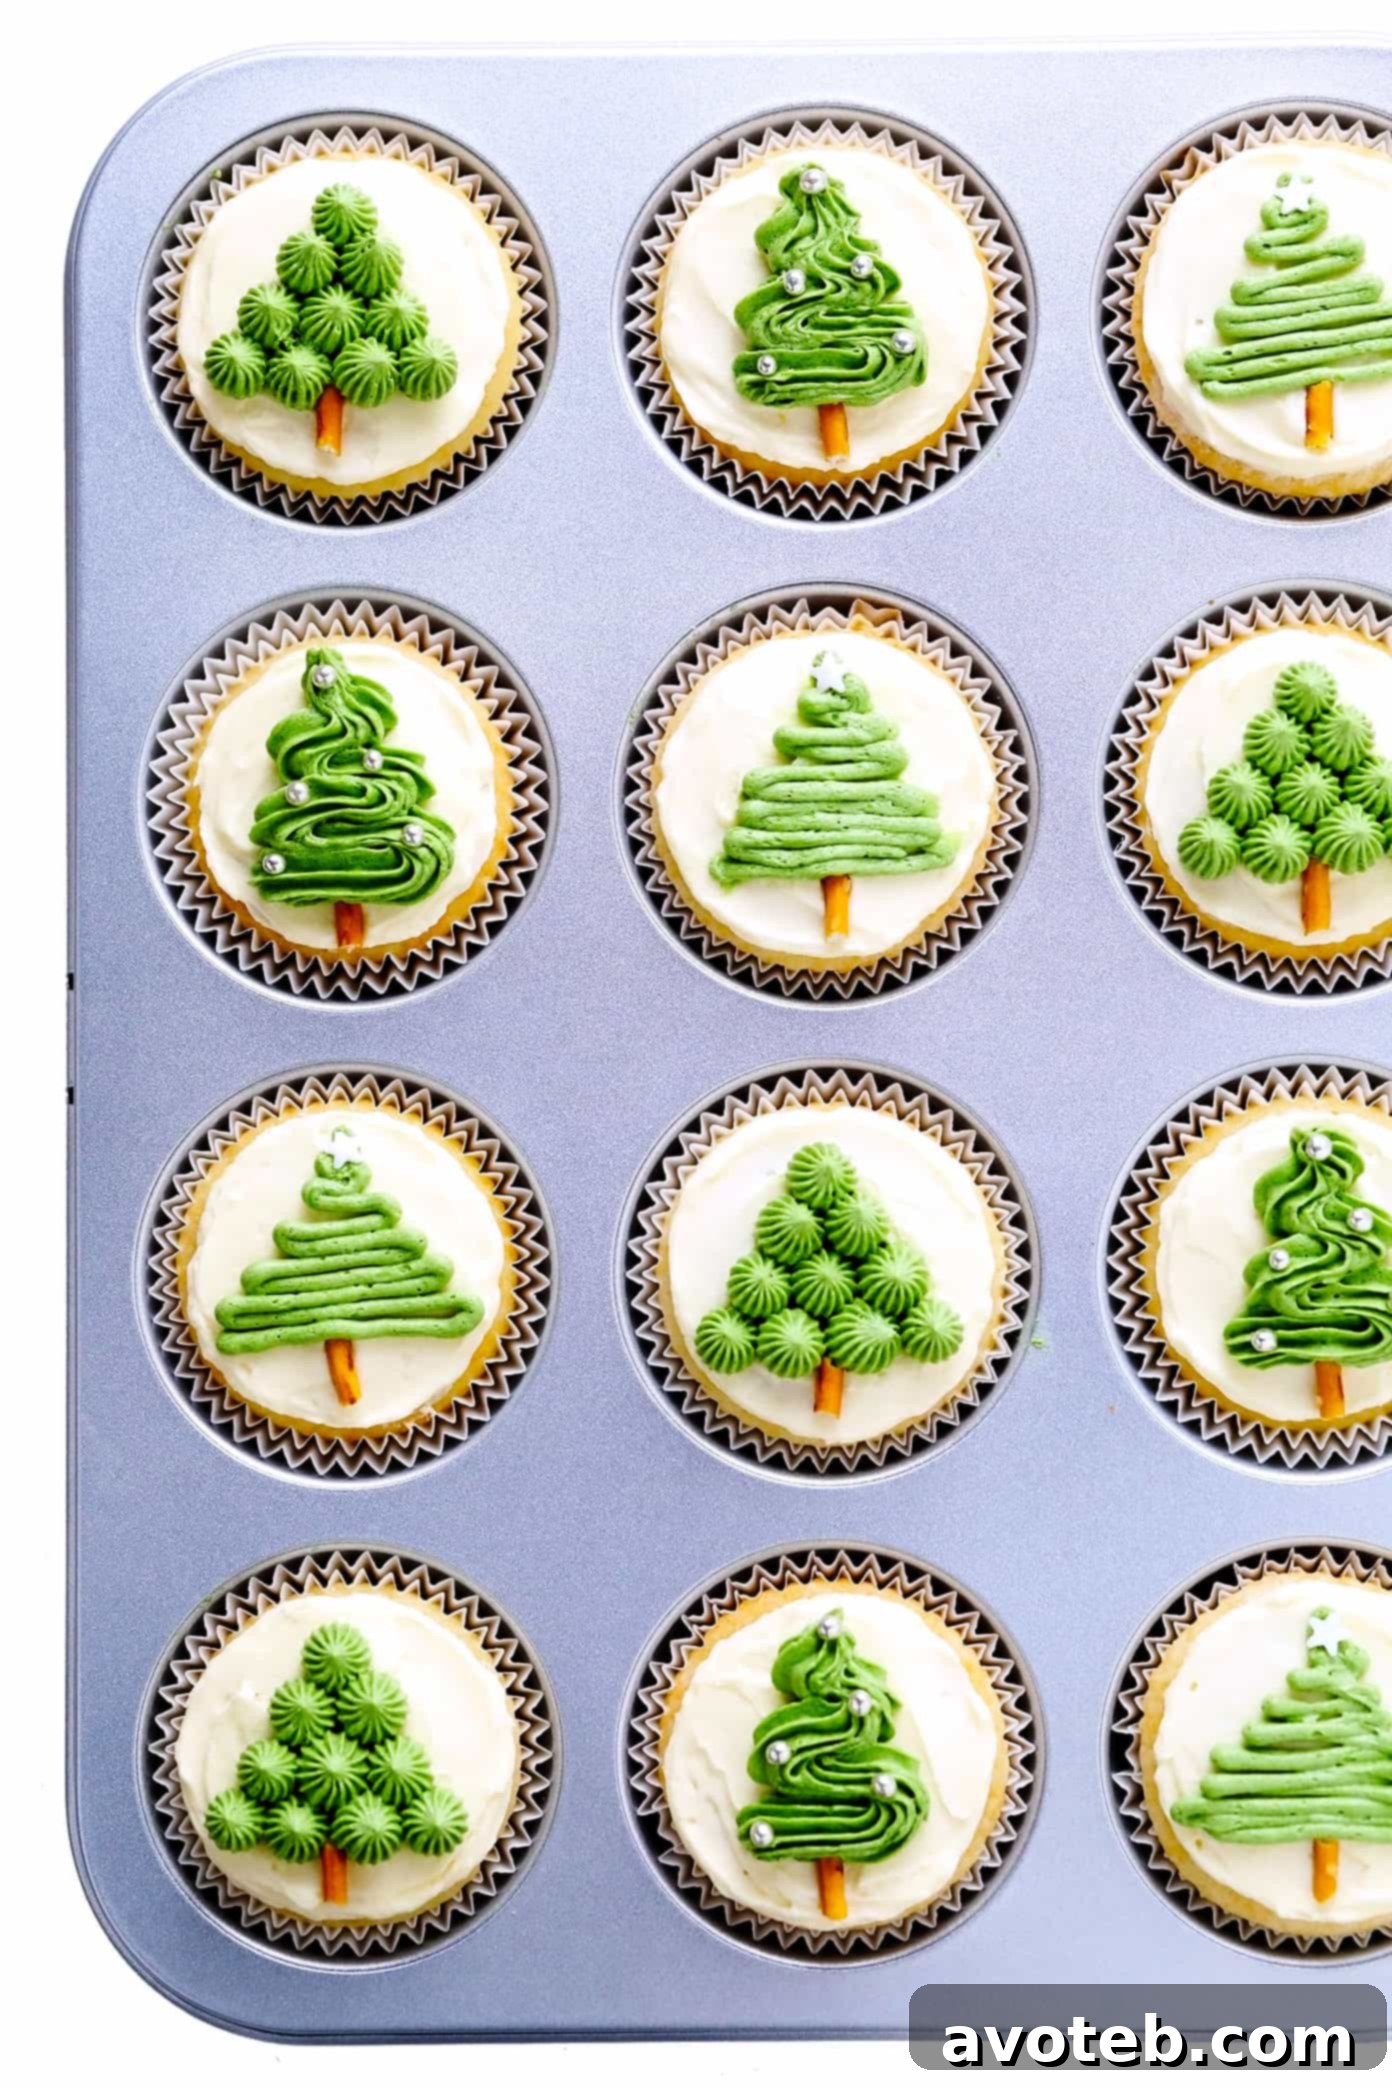
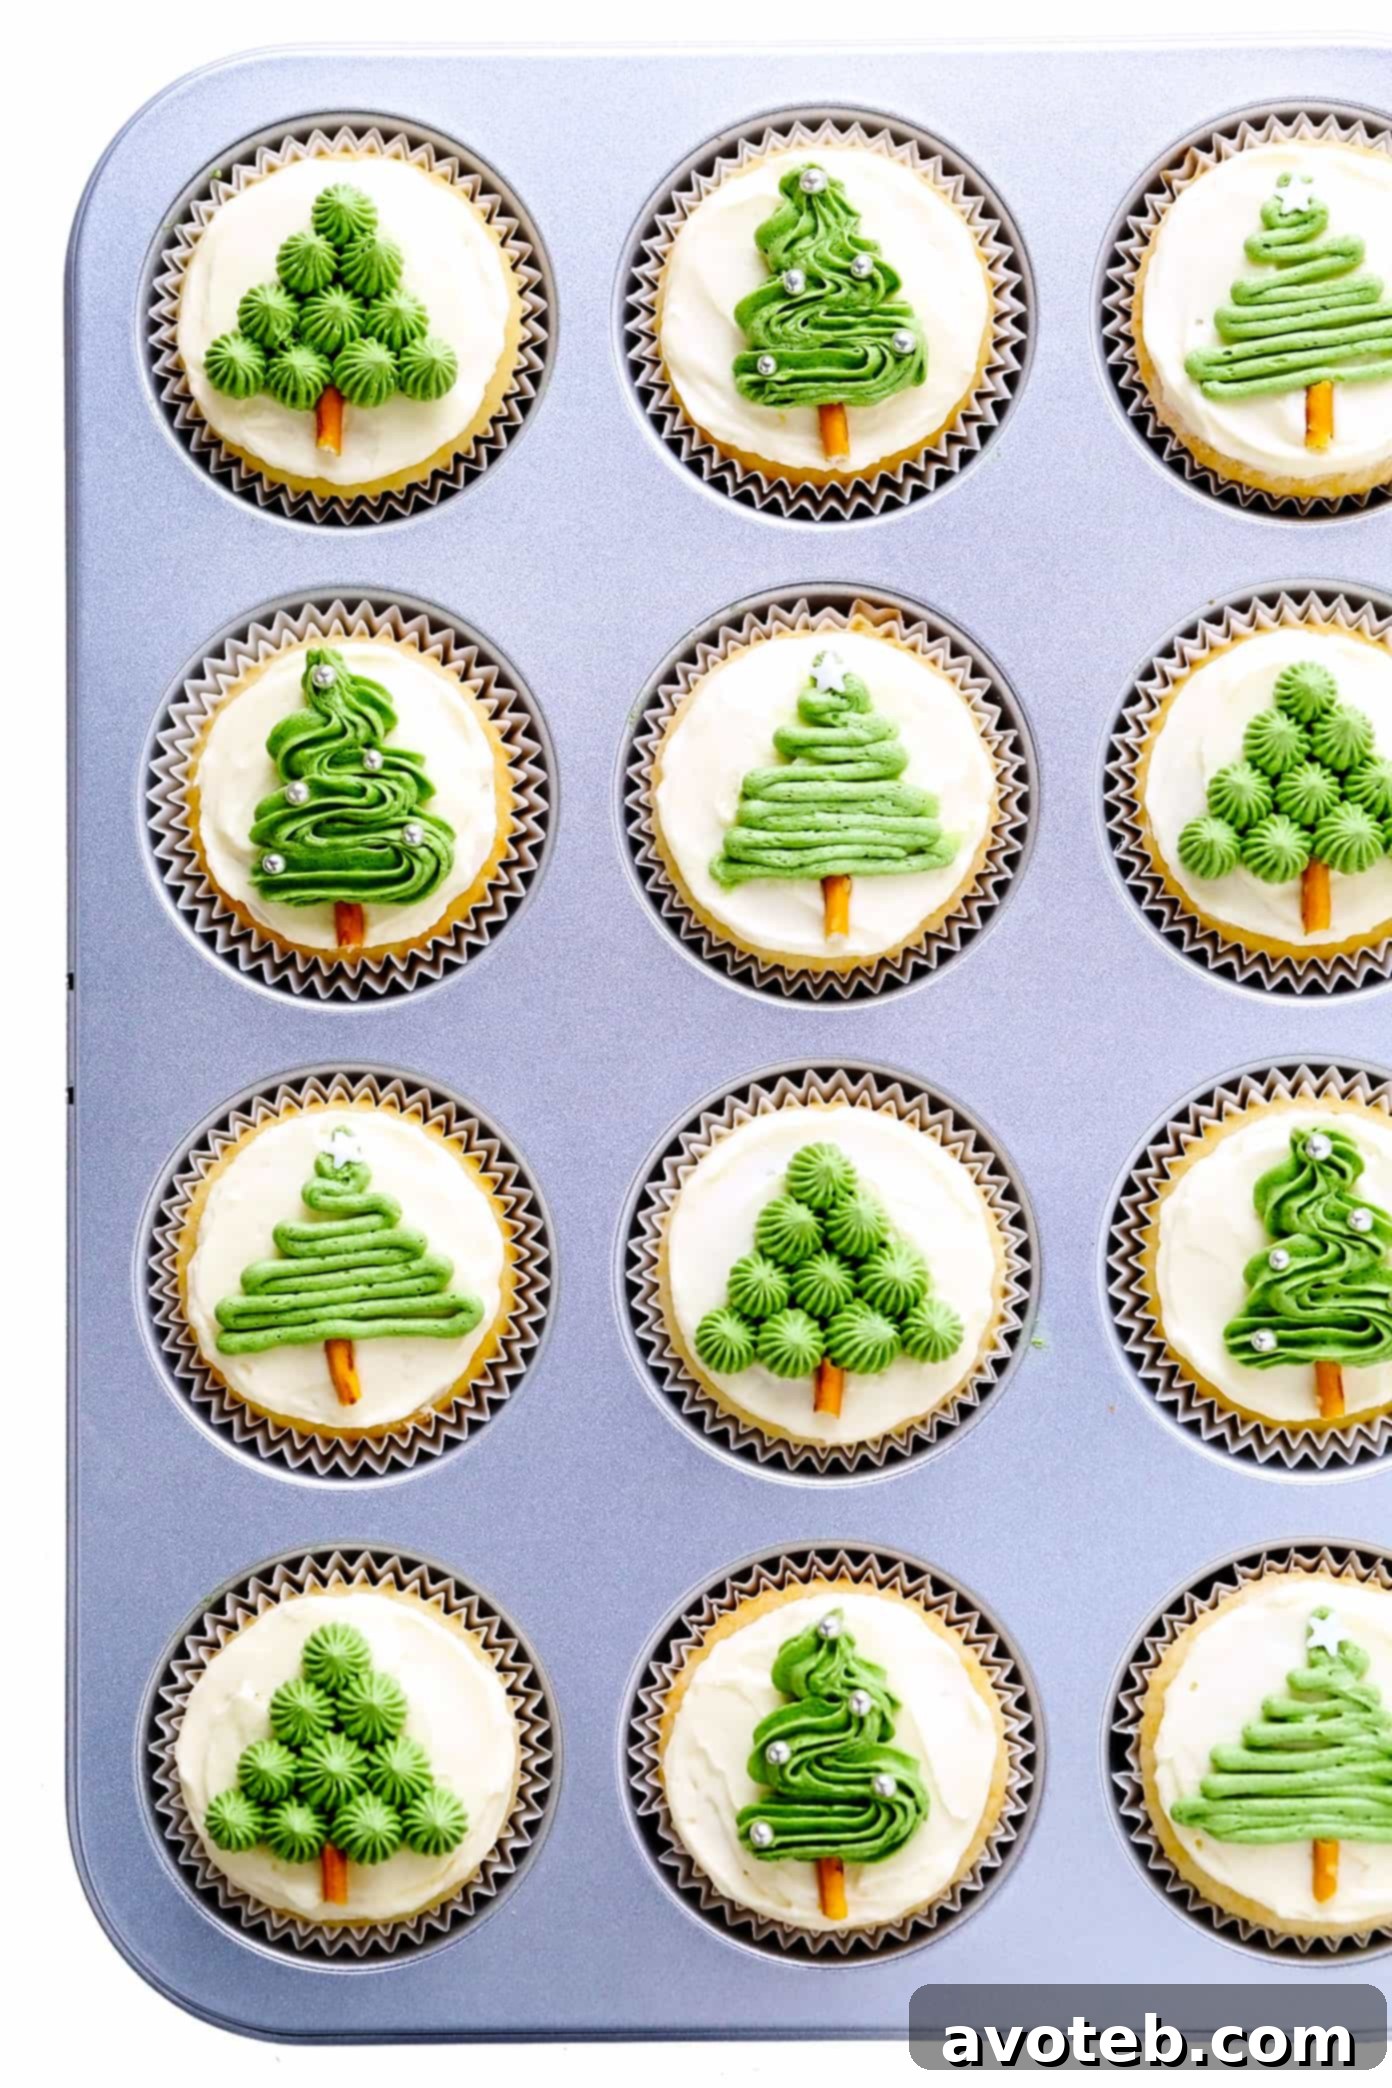
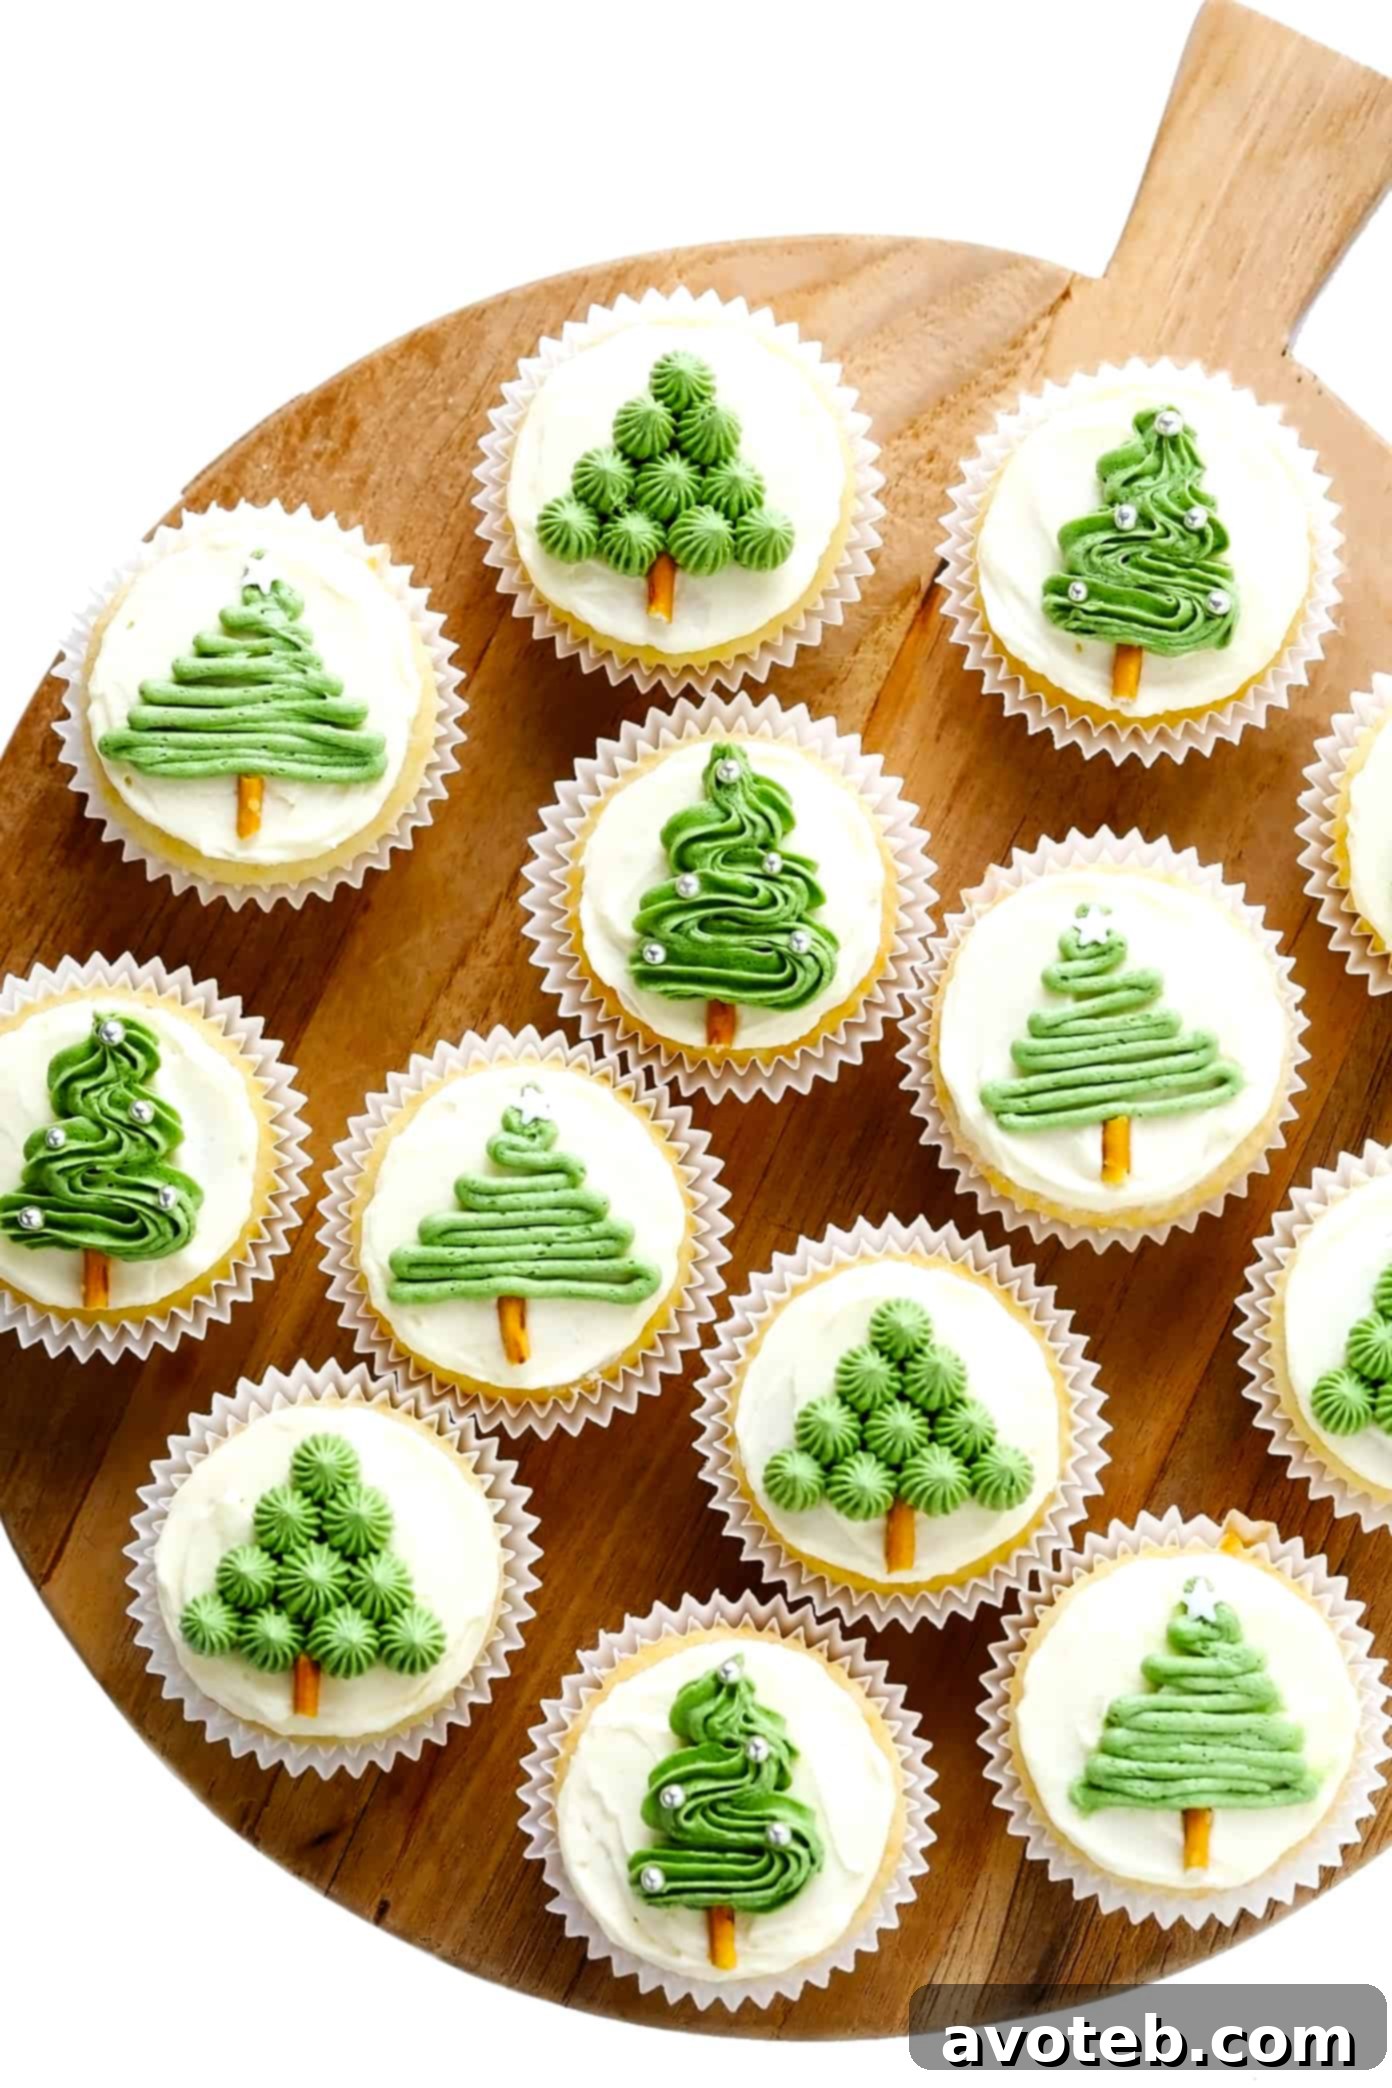
- Now, get creative with your tree designs! Refer to the image at the very top of this post for visual examples.
- For a classic star tree: Using Wilton #199 star tip, pipe nine green stars in a triangular pattern to form a tree. Start with a base of three stars, then two rows of two, and a single star at the top (as shown in the bottom-left example).
- For a swirling, soft tree: Use Wilton #18 star tip to pipe a continuous swirl, building upwards to form a conical tree shape (see bottom-center example). This creates a fuller, more textured tree.
- For a modern zigzag tree: Opt for Wilton #3 round tip and pipe a zigzag pattern from the base upwards, gradually narrowing to form a stylized tree.
- Once your green tree is piped, break off a small piece of a pretzel stick and gently insert it below the green piping to act as a rustic tree trunk.
- Finish your Christmas tree cupcakes by adding festive sprinkles to mimic ornaments, or a single star sprinkle at the top.
No Piping Tips? No Problem! If you don’t have piping tips, you can still create beautiful designs. Simply snip off a small corner of a sturdy ziplock bag to create a makeshift round tip. You can then swirl or zigzag the green frosting to form your trees or wreaths. Alternatively, for the simplest approach, spread the green frosting with a butter knife and then use the edge of the knife to create peaks and textures.
Pro Tips for Perfect Christmas Cupcakes
Achieving beautifully decorated cupcakes is easier than you think with a few smart techniques. Here are some essential “decorating tips” (pun intended!) to ensure your Christmas cupcakes turn out perfectly every time:
- Cool Down Completely: This is perhaps the most crucial tip. Always allow your baked cupcakes to cool down completely to room temperature before even thinking about frosting them. If the cupcakes are still warm, the heat will melt the butter in your frosting, causing it to slide right off and create a messy situation. To speed up the cooling process, you can carefully remove the cupcakes from the baking pan and transfer them to a wire rack. Placing them in the refrigerator for a short period can also help them cool more quickly.
- Perfect Buttercream Consistency: The consistency of your buttercream is paramount for successful piping. Generally, you want a stiff-peak consistency – this means if you dip a spoon into the frosting and turn it right-side-up, the frosting should hold its shape without drooping. Before committing an entire batch of buttercream to a piping bag, test a small spoonful with your chosen tip on a clean plate or piece of parchment paper. This allows you to check if it’s too thin (add more powdered sugar) or too thick (add a tiny bit more heavy cream or milk, one teaspoon at a time) and adjust accordingly without wasting effort or ingredients.
- Practice Makes Perfect: Don’t feel pressured to get it right on the first try! Even experienced decorators practice. Before frosting your actual cupcakes, try piping your desired design once or twice on a clean plate or a sheet of parchment paper. This helps you get a feel for the pressure, movement, and angle required. The best part? You can simply scoop up the practice icing and put it back into your piping bag, ensuring no delicious buttercream goes to waste.
- Sprinkle Immediately: If you plan to adorn your cupcakes with sprinkles, make sure to add them within 30 minutes of frosting. Buttercream starts to form a slight crust as it sits, and if it hardens too much, your festive sprinkles won’t adhere properly and will just roll off. Quick application ensures they stick perfectly, adding that extra sparkle to your holiday treats.
The Ultimate Vanilla Cupcake and Buttercream Recipe
Here it is – the foundation for your delightful Christmas cupcakes: a recipe for incredibly soft, moist vanilla cupcakes paired with a rich, silky vanilla buttercream. This recipe is designed for ease and deliciousness, making your holiday baking stress-free and rewarding.
Yield & Preparation Time:
This recipe yields approximately 16 standard-sized cupcakes. While the total time to prepare and bake is about 1 hour and 15 minutes (1 hour prep, 15 minutes cook), remember to factor in an additional 30-60 minutes for the cupcakes to cool completely before decorating. I often make the buttercream while the cupcakes are baking to maximize efficiency!
Ingredients for Fluffy Vanilla Cupcakes:
- 1 3/4 cups cake flour (ensure it’s not self-rising for best results)
- 1 cup granulated sugar
- 1 1/2 teaspoons baking powder
- 1/2 teaspoon baking soda
- 1/2 teaspoon salt
- 1/4 cup salted butter, at room temperature
- 2 large eggs, at room temperature
- 1/3 cup full-fat sour cream
- 1/4 cup vegetable oil (or canola oil)
- 1 tablespoon vanilla extract
- 2/3 cup whole milk, at room temperature
- Optional: a handful of festive sprinkles to fold into the batter for a fun surprise!
Ingredients for Silky Vanilla Buttercream:
- 1 cup salted butter, at room temperature
- 4 cups powdered sugar (confectioners’ sugar)
- 1/4 cup heavy cream
- 1 tablespoon vanilla extract
Instructions: Crafting Your Vanilla Cupcakes
- Prepare for Baking: Preheat your oven to 350°F (180°C). Line two standard cupcake pans with a total of 16 cupcake liners. If you only have one pan, you can bake in two batches.
- Combine Dry Ingredients: In a large mixing bowl or the bowl of a stand mixer fitted with the paddle attachment, whisk together the cake flour, granulated sugar, baking powder, baking soda, and salt. Mix until they are thoroughly combined and no lumps remain.
- Incorporate the Butter: Add the room-temperature salted butter to the dry ingredients. Mix on medium-low speed for about 3 minutes, pausing to scrape down the sides of the bowl as needed. The mixture should transform into a fine, sandy crumb texture.
- Whisk Wet Ingredients Separately: In a separate, smaller bowl, whisk together the large eggs, sour cream, vegetable oil, and vanilla extract until the mixture is smooth and well-emulsified.
- Integrate Wet into Dry: Pour the egg mixture into the flour mixture. Beat on medium speed for 30 seconds, or just until the ingredients are combined. Reduce the mixer speed to low and gradually add the room-temperature whole milk, mixing only until it is just incorporated. The batter will be noticeably liquid.
- Bake to Perfection: Fill each cupcake liner so it’s just slightly more than halfway full. Bake for 14 to 16 minutes, or until a toothpick inserted into the center of a cupcake comes out clean. Once baked, transfer the entire pan to a wire rack and allow the cupcakes to cool completely to room temperature before attempting to frost them.
Instructions: Whipping Up Your Vanilla Buttercream
- Beat the Butter: In a large mixing bowl or the bowl of a stand mixer, add the room-temperature salted butter. Beat on medium speed for 2 to 3 minutes until the butter becomes noticeably light in color and fluffy in texture. This step is crucial for airy buttercream.
- Add Remaining Ingredients: Gradually add the powdered sugar, heavy cream, and vanilla extract to the whipped butter. Start mixing on low speed for 1 minute until all ingredients are just combined and the powdered sugar is incorporated. Scrape down the sides and bottom of the bowl thoroughly.
- Achieve Smoothness and Adjust: Increase the mixer speed to medium and beat for an additional 2 minutes until the buttercream is completely smooth, creamy, and free of lumps.
- If the buttercream is too thin: Add 1 to 2 cups of additional powdered sugar, one-half cup at a time, beating until smooth after each addition, until the desired stiff consistency is reached.
- If the buttercream is too thick: Add 1 tablespoon of heavy cream (or more, if needed), beating until smooth after each addition, until the desired piping consistency is achieved.
Equipment You’ll Need:
Having the right tools can make all the difference in your baking and decorating journey. Here are some recommended items:
- Natural Food Coloring
- Festive Sprinkles Medley
- Wilton Decorating Set (or individual tips #3, #18, #199)
- Stand mixer or hand mixer
- Cupcake pans
- Cupcake liners
- Piping bags
- Small offset spatula (optional, but helpful)
Important Recipe Notes:
- Choosing Your Sprinkles: While I used a medley similar to these green metallic sprinkles, feel free to get creative! Amazon offers a vast array of fun mixes. For a natural alternative, this brand of natural sprinkles is an excellent choice, free from artificial colorings.
- Storage Instructions:
- Unfrosted baked cupcakes: Can be stored in an airtight container at room temperature for up to 3 days.
- Plain buttercream: Can be refrigerated in a sealed container for up to 1 week. Bring to room temperature and re-whip before using.
- Frosted cupcakes: For optimal freshness and safety, especially with dairy-rich buttercream, frosted cupcakes should be stored in a sealed container in the refrigerator for up to 5 days. Allow them to come to room temperature for about 15-20 minutes before serving for the best texture.
- Prep Time Considerations: The prep time listed in the recipe (1 hour) mainly approximates the active time spent decorating the cupcakes. It does not fully account for the crucial cooling time of the cupcakes, which can range from 30 to 60 minutes depending on your kitchen’s temperature. To save time, consider preparing your buttercream while the cupcakes are baking in the oven.
- Recipe Source: The vanilla cupcake recipe is a slightly adapted version of the consistently reliable and popular famous vanilla cupcake recipe from Cupcake Project.
More Festive Dessert Ideas for Your Holiday Table
If you’re looking to expand your holiday baking repertoire beyond these delightful Christmas cupcakes, here are a few more of my absolute favorite festive treats that are sure to bring joy to any celebration:
- Irresistible Christmas Cookies: While we ventured into cupcakes today, cookies remain a holiday staple! Explore our full collection of cookie recipes. My personal favorites for this time of year include classic gingerbread cookies with their warm spices, elegant linzer cookies, nostalgic peanut butter blossoms, delightfully fudgy chocolate crinkle cookies, and, of course, the universally loved classic chocolate chip cookies.
- Delightful Candied Pecans: A batch of candied pecans is incredibly versatile. They’re wonderful for gifting, perfect for snacking by the handful, and make an exquisite topping for salads or other desserts. Their sweet crunch is simply addictive!
- Comforting Apple Crisp: Nothing says cozy holidays quite like a warm, bubbling homemade apple crisp. It’s an ideal way to utilize the season’s fresh apples. Serve it warm with a generous scoop of vanilla ice cream and a drizzle of my favorite bourbon caramel sauce for an unforgettable dessert experience.
- Indulgent Cinnamon Rolls: A cherished tradition in our household is making my famous 1-hour cinnamon rolls on Christmas morning. Topped with a luscious cream cheese icing, they are an absolute dream – soft, gooey, and utterly irresistible.
Share Your Beautiful Christmas Cupcake Creations!
We absolutely love seeing what you bake! If you decide to make these festive Christmas cupcakes, or any of our other recipes, please share your beautiful creations with us on social media. Tag @gimmesomeoven on Instagram and use the hashtag #gimmesomeoven so we can admire your work!