

This homemade naan recipe is exceptionally easy to follow, yielding perfectly soft, wonderfully chewy, and consistently delicious flatbread. For an extra layer of flavor, a fantastic garlic naan option is also detailed below!

Unlock the Secret to Perfect Homemade Naan
Imagine sinking your teeth into a piece of warm, pillowy soft naan bread, fresh from your own kitchen. The aroma of freshly baked bread, perhaps with a hint of garlic, fills the air. If you’ve ever dreamt of recreating that magical experience usually reserved for your favorite Indian restaurant, prepare to be amazed. Making homemade naan is not only incredibly satisfying but also surprisingly straightforward, even without a traditional Tandoor oven.
For years, this soft, buttery, and utterly irresistible flatbread has been a staple side dish whenever I’ve dined out at Indian eateries. The traditional method involves baking naan inside scorching-hot Tandoor ovens, imparting that characteristic smoky flavor and bubbly texture. However, the good news is that you can achieve remarkably similar results right in your own kitchen using a simple stovetop skillet. This recipe has been refined over time and has become a beloved staple for thousands of our readers, proving that authentic-tasting naan is well within your reach.
Why Bake Naan at Home?
Beyond the sheer joy of creating something delicious from scratch, there are numerous benefits to making your own naan bread:
- Unmatched Freshness: Nothing compares to the taste and texture of warm naan pulled directly from the skillet. The freshness is unparalleled, offering a truly gourmet experience.
- Customization at Your Fingertips: This recipe serves as a versatile canvas. Whether you crave classic plain naan, a vibrant garlic naan, or something more adventurous with herbs or cheese, you have complete control over the flavor profile.
- Cost-Effective: Making naan at home is significantly more economical than purchasing it pre-made, especially if you enjoy it frequently.
- A Fun and Rewarding Culinary Project: The process itself is enjoyable, from activating the yeast to watching the dough puff up on the skillet. It’s a rewarding activity for home cooks of all skill levels.
- Quality Ingredients: You know exactly what goes into your bread, allowing you to choose high-quality ingredients and avoid unwanted additives.
My go-to homemade naan recipe relies on fundamental bread ingredients – flour, water, and yeast – but elevates them with a generous addition of plain yogurt, an egg, and a touch of baking powder. These key ingredients work in harmony to ensure the bread is exceptionally soft, wonderfully chewy, and retains moisture. I also favor a hint of honey to provide a natural, subtle sweetness that complements the savory notes. And for those who adore garlic, I’ve included an optional (but highly recommended!) garlicky butter sauce to brush on the warm bread immediately after cooking. A sprinkle of fresh parsley and flaky sea salt adds the perfect finishing touch, enhancing both flavor and presentation.
This recipe has been thoughtfully revised to include comprehensive instructions for both hand-mixing and using a stand mixer, catering to different preferences and kitchen setups. Furthermore, I’ve incorporated creative options for infusing your naan with extra herbs, rich cheeses, or traditional nigella seeds, allowing you to personalize your flatbread masterpiece. If you haven’t yet experienced the delight of homemade naan, now is the perfect time! Grab your skillet, and let’s embark on this delicious baking adventure together.
Homemade Naan: A Visual Guide (1-Minute Video Snapshot)
For a quick overview of the naan-making process, a concise 1-minute video highlights the key steps from dough preparation to cooking. Visual learners will find this a helpful resource to guide them through the recipe, showcasing the dough’s texture, the rising process, and the irresistible sizzle of naan on the stovetop. While the full interactive video player isn’t embedded directly here, you can find it on the original recipe page for a dynamic demonstration.
Essential Ingredients for Homemade Naan Bread
Before diving into the full recipe, let’s explore the crucial components that bring this incredible homemade naan bread to life. Each ingredient plays a specific role in achieving that sought-after soft, pillowy, and chewy texture:
- Warm Water: This is vital for activating the yeast. The ideal temperature is around 110°F (43°C). It should feel pleasantly warm, not hot, to the touch. Using a cooking thermometer is highly recommended to ensure accuracy; water that’s too hot will kill the yeast, while water that’s too cold won’t allow it to activate properly.
- Honey: A touch of honey not only adds a delicate sweetness but also provides food for the yeast, aiding in its activation and contributing to the bread’s beautiful golden-brown crust. If preferred, an equal amount of granulated sugar or another liquid sweetener can be substituted.
- Active Dry Yeast: You’ll need one standard quarter-ounce packet, which typically equates to about 2 1/4 teaspoons if you purchase yeast in bulk. Ensure your yeast is fresh and active for the best rise.
- All-Purpose Flour: This recipe is designed for standard all-purpose flour, which yields a wonderfully soft and tender naan. While experimenting with alternative flours is possible, results may vary. If you do try a different flour, we encourage you to share your feedback in the comments below!
- Baking Powder: A secret weapon for extra lift and an incredibly soft texture, baking powder works in conjunction with the yeast to give the naan its characteristic airy bubbles.
- Salt: Fine sea salt is incorporated into the dough to enhance its flavor. Additionally, a sprinkle of flaky sea salt on top of the cooked naan just before serving adds a delightful textural contrast and a burst of savory goodness.
- Plain Yogurt: This ingredient is a game-changer for naan, contributing to its incredible tenderness, moisture, and a subtle tang. Any type of plain yogurt, including plain Greek yogurt, will work perfectly.
- Large Egg: The egg acts as a binder, helping to bring the dough together, while also enriching the dough and contributing to a softer crumb and a beautiful golden color.
- Garlic Butter Sauce (Optional, but highly recommended): This simple yet transformative sauce consists of melted salted butter briefly sautéed with fresh minced garlic. A touch of finely chopped fresh parsley can be stirred in for color and herbaceous flavor. Brushing this mixture onto the warm naan after cooking elevates it to another level of deliciousness.
Expert Tips for Naan Bread Success
While the full step-by-step instructions are provided in the recipe card below, here are some crucial tips to help you achieve perfect homemade naan every time:
- Precision in Water Temperature is Key: As mentioned, the water for activating yeast must be around 110°F (43°C). This temperature range is crucial for yeast activity. Too hot, and you’ll kill the yeast, preventing your dough from rising. Too cold, and the yeast won’t activate effectively, resulting in a dense naan. A food thermometer is your best friend here.
- Verify Yeast Freshness: The initial step of combining warm water, honey, and yeast is called proofing. If, after 5-10 minutes, your yeast mixture doesn’t become bubbly and foamy, it’s a sign that your yeast might be old or inactive. It’s best to discard it and start with a fresh packet to avoid a flat batch of naan.
- Embrace Imperfection in Shape: Don’t stress over making perfectly round or identically sized naan pieces. The charm of homemade bread often lies in its rustic appearance. Just aim for relatively even thickness when rolling out the dough (around 1/4-inch) to ensure consistent cooking. Whether they’re perfectly oval or charmingly irregular, they’ll still taste amazing!
- Adjust Thickness to Your Preference: I personally love a thicker, chewier naan with a satisfying bite, so I roll my dough to about 1/4-inch thick. However, if you prefer a thinner, crispier naan with more pronounced bubbles, feel free to roll your dough out even thinner. This slight adjustment can dramatically change the texture.
- The Power of a Hot Skillet: A well-heated cast-iron skillet or heavy non-stick pan is essential for proper cooking. High heat creates those desirable bubbles and a beautiful golden crust quickly. Ensure your pan is smoking hot before adding the dough.
- Don’t Overcrowd the Pan: Cook naan one piece at a time to maintain consistent heat in the skillet and allow each piece to cook evenly.
- Keep Naan Warm: As you cook each piece, stack them and cover them with a clean kitchen towel. This helps trap steam, keeping the naan warm and soft until you’re ready to serve.
- Troubleshooting Sticky Dough: If your dough feels overly sticky after mixing, add flour a tablespoon at a time until it’s more manageable but still soft and slightly tacky. Avoid adding too much flour, as this can result in tough naan.

Creative Naan Recipe Variations to Explore
One of the most exciting aspects of making homemade naan is the endless possibilities for customization. Whether you lean towards traditional flavors or enjoy venturing into non-traditional realms, feel free to get creative and experiment with these delightful variations:
- Garlic Butter Naan (Highly Recommended): As mentioned, the garlic butter option is a game-changer. The aromatic blend of sautéed garlic and rich melted butter brushed over the warm naan adds an incredible depth of savory flavor that’s truly addictive. I honestly rarely make this recipe without it anymore – it’s that good!
- Fresh Herb Infusion: Incorporating fresh herbs is a classic way to enhance naan. Finely chopped fresh cilantro or parsley are traditional choices, often kneaded directly into the dough or sprinkled on top with the garlic butter. However, don’t limit yourself! Experiment with other fresh herbs like chives, rosemary, or even a mixed herb blend. Dried herbs can also work well, especially when combined with the garlic butter. For a unique twist, I occasionally sprinkle some everything bagel seasoning or aromatic za’atar onto my naan, which I wholeheartedly recommend for an unexpected burst of flavor.
- Cheesy Naan Delights: While perhaps less traditional, adding cheese to naan creates an unbelievably delicious treat. You can knead a handful of shredded cheddar, mozzarella, or a blend of your favorite cheeses directly into the dough before rolling. Alternatively, sprinkle freshly-grated Parmesan or a mild feta onto the naan as it finishes cooking on the skillet, allowing the cheese to melt and crisp slightly. The result is a savory, gooey, and utterly satisfying flatbread.
- Spice It Up: For those who love a bit of heat, consider adding a pinch of red chili flakes to the dough or the garlic butter. You could also mix in a tiny amount of finely minced green chili for a more robust kick.
- Nigella Seed Naan: For an authentic touch, sprinkle nigella seeds (also known as kalonji) onto the naan dough just before cooking. These small black seeds add a unique, slightly oniony, and peppery flavor, along with a beautiful visual appeal.
- Whole Wheat Naan: For a slightly healthier and heartier version, you can experiment with replacing a portion of the all-purpose flour with whole wheat flour. Start by substituting 1/4 to 1/2 of the all-purpose flour with whole wheat, adjusting water as needed, as whole wheat flour absorbs more liquid. Note that the texture will be denser.

Versatile Ways to Enjoy Your Naan Bread
Once you’ve mastered the art of homemade naan, you’ll discover its incredible versatility. This delicious flatbread can be enjoyed in countless ways, transforming simple meals into extraordinary culinary experiences. Here are some fantastic ideas to put your freshly baked naan to use:
- As a Standalone Side or Dipper: The simplest pleasure is often the best. Serve warm naan as a delightful side dish to almost any meal. It’s perfect for tearing and scooping up rich curries, hearty soups, comforting stews, or a variety of dips like hummus, baba ghanoush, or cooling raita.
- Gourmet Flatbreads or Pizzas: Naan makes an exceptional base for quick and easy flatbreads or individual pizzas. Simply spread your favorite sauce (tomato, pesto, or even a garlic-yogurt blend), add your choice of toppings – cheeses, vegetables, cooked meats – and bake or grill until the cheese is bubbly and the crust is crisp.
- Delicious Sandwiches or Paninis: Transform your ordinary sandwiches into something special using naan bread. Fill it with deli meats, fresh vegetables, and your favorite spreads. For an extra treat, grill the filled naan to create warm, pressed paninis with a crispy exterior.
- Flavorful Wraps or Tacos: Naan is an excellent alternative to tortillas for making wraps and tacos. Its soft and pliable nature holds fillings beautifully. Stuff it with savory falafel and fresh salads, succulent chicken souvlaki, grilled vegetables, or spiced ground meats for an unforgettable meal.
- With Eggs for Breakfast: Use naan as a base for a hearty breakfast. Top it with scrambled eggs, cheese, and perhaps some sautéed spinach or mushrooms for a delightful morning meal.
- Sweet Naan Dessert: For a unique dessert, brush naan with melted butter, sprinkle with cinnamon sugar, and lightly toast. Serve with fruit or a scoop of ice cream.

Homemade Naan
Prep Time: 15 minutes
Cook Time: 75 minutes
Total Time: 1 hour 30 mins
Yield: 8 servings 1x
Description
This homemade naan recipe is easy to make, perfectly soft and chewy, and always so delicious. I highly recommend adding the garlic butter option listed below!
Ingredients
Scale
Naan Ingredients:
- 1 cup warm water (about 110°F / 43°C)
- 2 tablespoons honey
- 1 (0.25 ounce) package active dry yeast (about 2 1/4 teaspoons)
- 3 1/2 cups all-purpose flour
- 1/4 cup plain yogurt (Greek or regular)
- 2 teaspoons fine sea salt
- 1/2 teaspoon baking powder
- 1 large egg
(Optional) Garlic Butter Ingredients:
- 1/4 cup salted butter
- 3 cloves garlic, peeled and minced
- finely- chopped fresh cilantro or parsley
- (optional) flaky sea salt
Instructions
- Activate the Yeast: In the bowl of a stand mixer (or a large mixing bowl for hand-mixing), gently stir together the warm water and honey. Sprinkle the active dry yeast evenly over the surface of the liquid. Give it a quick, gentle stir to incorporate, then let the mixture sit undisturbed for 5-10 minutes. During this time, the yeast should become visibly foamy and bubbly, indicating it’s active and ready. If it doesn’t foam, your yeast may be expired or the water temperature was incorrect; it’s best to start over.
- Mix the Dough: To the activated yeast mixture, add the all-purpose flour, plain yogurt, fine sea salt, baking powder, and the large egg. If using a stand mixer, attach the dough hook and mix on medium-low speed for 2-3 minutes. The dough should come together, becoming relatively smooth and forming a ball that largely pulls away from the sides of the mixing bowl. It will still be slightly sticky to the touch. If the dough seems excessively sticky and doesn’t form a cohesive ball, add a tablespoon of flour at a time until the desired consistency is achieved. (For hand-mixing instructions, see notes below.)
- Allow the Dough to Rise: Carefully remove the dough from the mixing bowl and use your hands to gently shape it into a smooth ball. Lightly grease the mixing bowl (or a separate clean bowl) with cooking spray. Place the dough ball back into the greased bowl, then cover it snugly with a damp kitchen towel or plastic wrap. Position the bowl in a warm location (a sunny window, near a warm oven, or a proofing drawer are ideal spots) and allow the dough to rise for approximately 1 hour, or until it has nearly doubled in size. This rising time is crucial for developing flavor and texture.
- (Optional) Prepare the Garlic Butter: During the final 10-15 minutes of the dough’s rising time, prepare the optional garlic butter. In a small sauté pan, melt the salted butter over medium heat. Once melted, add the minced garlic and cook for 1-2 minutes, stirring frequently, until the garlic is fragrant and lightly golden. Be careful not to burn it. Remove the pan from the heat. Stir in the finely chopped fresh cilantro or parsley, if desired. For a smoother garlic butter, you can strain out the garlic pieces, though I prefer to leave them in for texture and flavor. Set aside.
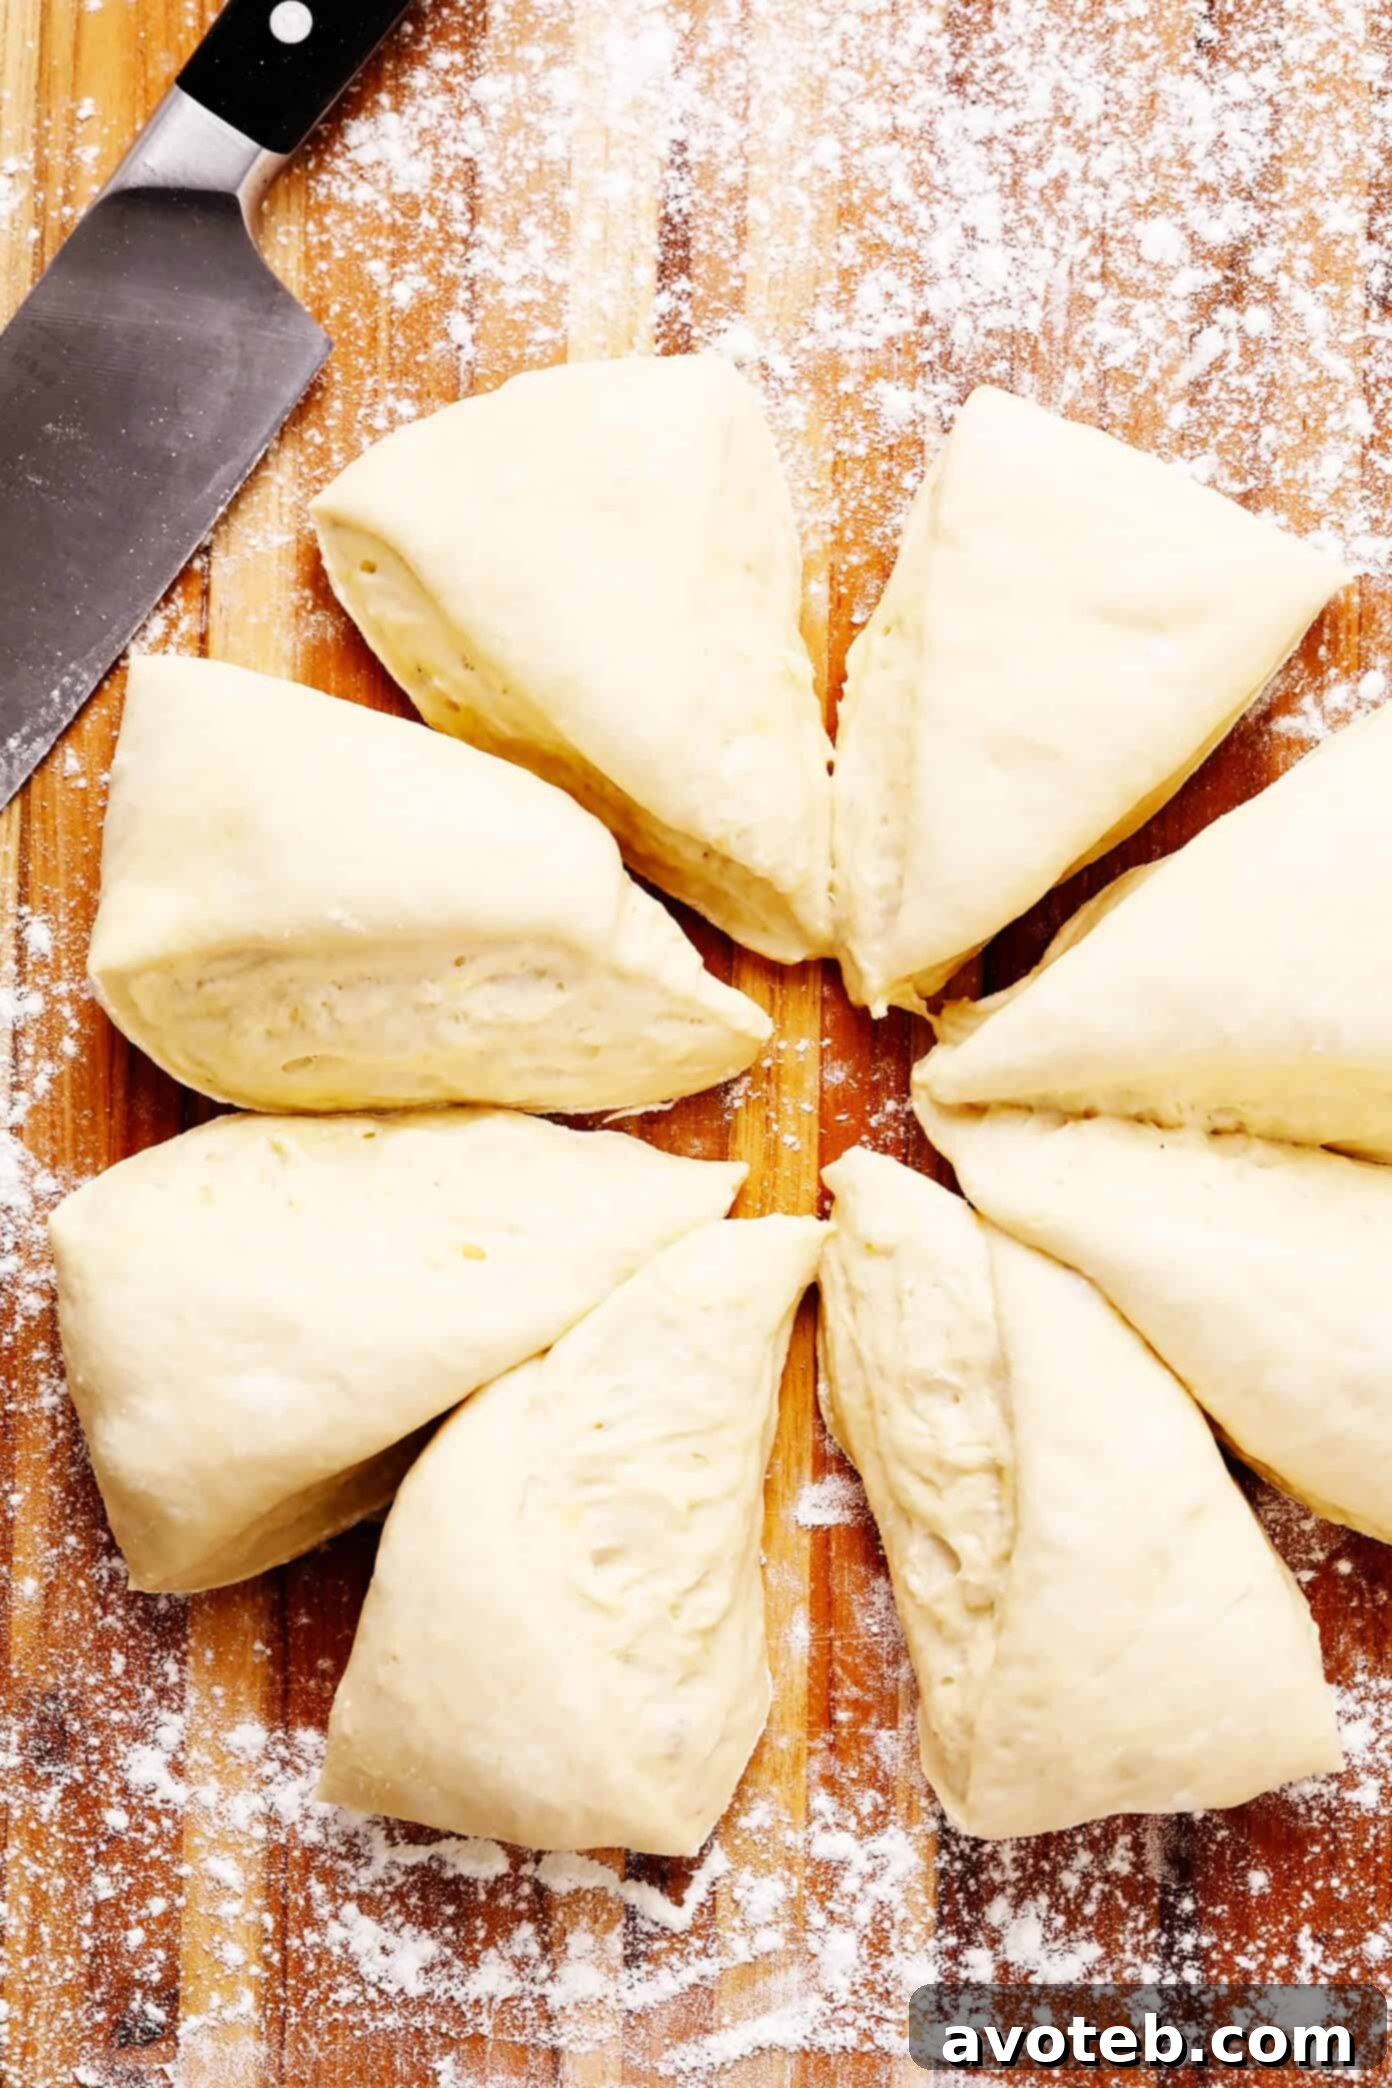
- Roll Out the Dough: Once the dough has risen, transfer it to a lightly floured work surface. Gently shape the dough into an even (or close to even) circular form. Using a sharp knife or bench scraper, divide the dough into 8 equally-sized wedges. Take each wedge and roll it into a smooth ball with your hands. Then, using a rolling pin, roll out each dough ball until it forms an oval shape, approximately 1/4-inch thick. To streamline the cooking process, I recommend multi-tasking: roll out the next dough ball while one piece of naan is cooking on the stove.
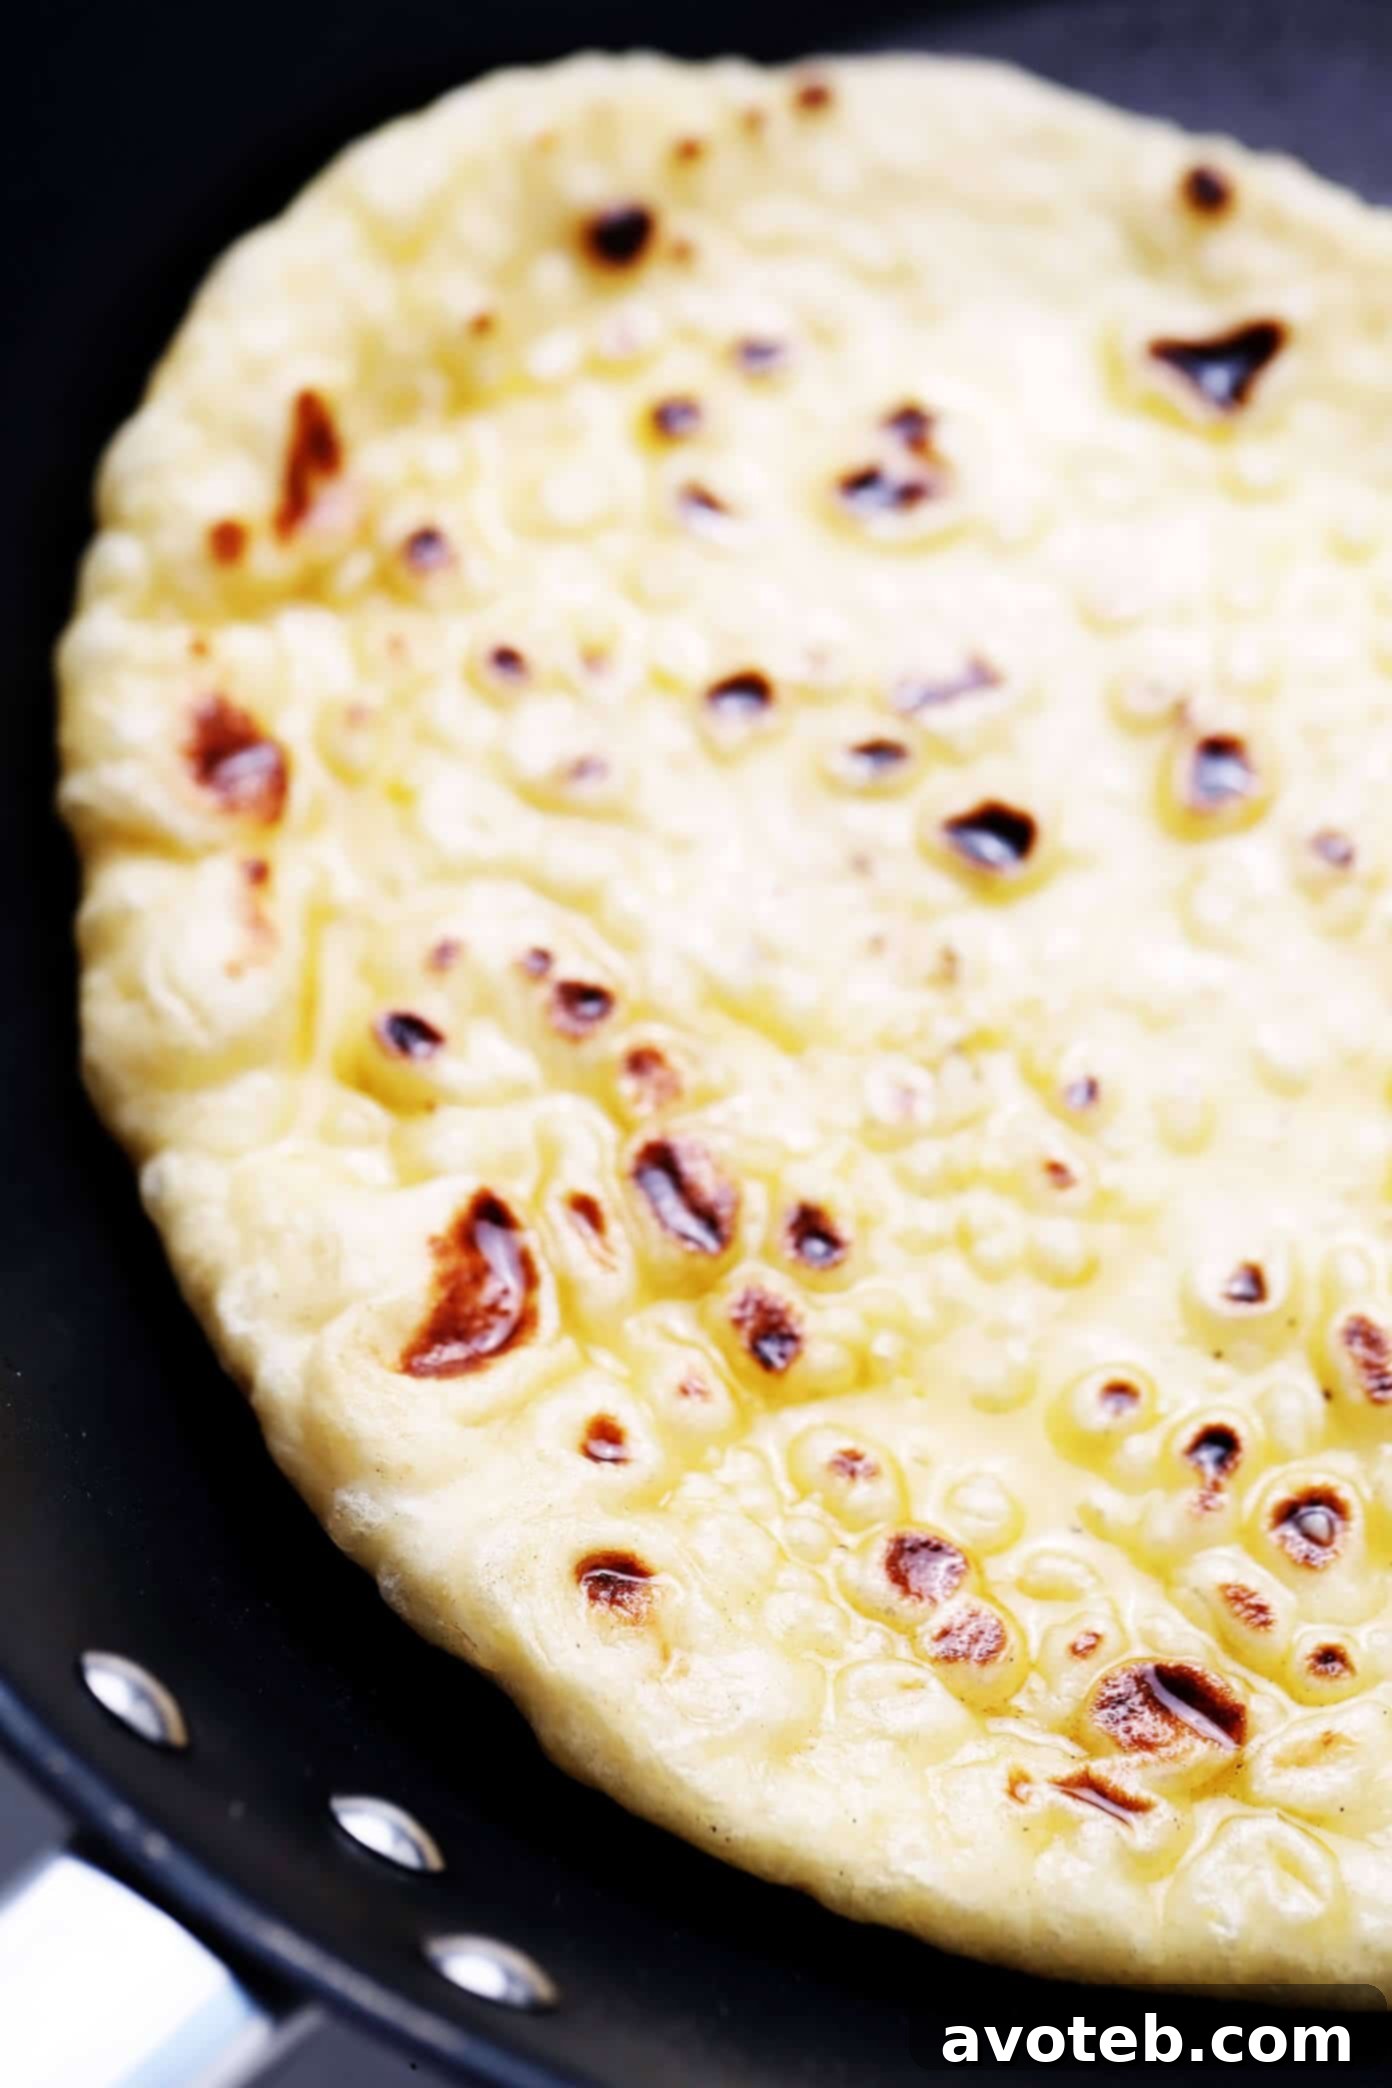
- Cook the Naan: Heat a large cast-iron skillet or a heavy non-stick sauté pan over medium-high heat until it is thoroughly hot. You should see a wisp of smoke or feel significant heat when you hold your hand a few inches above the surface. Place one piece of the rolled-out naan dough into the hot pan. Cook for approximately 1 minute, or until you see large bubbles forming on the surface of the dough and the bottom side has turned a beautiful light golden brown. Flip the naan and cook on the second side for another 30-60 seconds, or until that side is also golden and slightly charred in spots. Transfer the cooked naan to a clean plate. If you are making garlic naan, immediately brush one or both sides of the warm naan with the prepared garlic butter. For an added touch, sprinkle the naan with a pinch of flaky sea salt, if desired. Lightly cover the cooked naan with a clean kitchen towel to keep it warm and soft. Repeat this process with the remaining dough, adjusting the heat of the pan as needed to maintain a consistently hot temperature without burning the bread.
- Serve and Enjoy: Serve your freshly made homemade naan warm, either as a side, for dipping, or as the base for your favorite wraps and pizzas. Enjoy the soft, chewy texture and incredible flavor!
Notes
To make the dough by hand: If you don’t have a stand mixer, you can easily prepare the dough by hand. Complete step 1 (activating the yeast) in a large mixing bowl. Then, add the flour, yogurt, salt, baking powder, and egg to the bowl. Use a sturdy spoon or spatula to stir the mixture until it comes together into a shaggy dough. Turn the dough out onto a lightly floured surface and knead by hand for 3 to 4 minutes. Continue kneading until the dough becomes smooth and elastic. The dough will still be slightly sticky, but it should form a cohesive ball. If it’s too sticky to handle, add a tiny bit more flour, a teaspoon at a time, as you continue to knead. Proceed with step 3 (rising) as instructed.
Storage and Reheating: Leftover naan can be stored in an airtight container or a resealable bag at room temperature for up to 2 days, or in the refrigerator for up to 4-5 days. To reheat, lightly dampen the naan with a little water, then warm it in a hot skillet for 30-60 seconds per side, or in a toaster oven until soft and heated through. You can also freeze cooked naan for up to 3 months; thaw at room temperature, then reheat as desired.
Recipe Source: This recipe has been adapted and refined from a classic All Recipes version. The photographs and recipe details, including the optional garlic butter, were last updated in November 2020 to provide the most delicious and user-friendly experience.